Saturday 9 January 2021

Three very different Napoleonics

When one thinks "Napoleonic" warfare the huge battle comes to mind. But of course one can do smaller engagements also. Different style of basing and sizing for different warfare.

My skirmish level Napoleonics has units in small groups of 6 or 12 using currently the rules "Rebels and Patriots" (yes, yes, designed for American wars but really suitable for any Horse and Musket era) 

The latest unit for any skirmish actions are the Brunswick Advantgarde Jagers of the Waterloo Campaign.  Created from only two poses of the original Perry ACW plastics box,  I did some minor scraping, chopped off heads, glued on some arms and added the Corhut style headwear.  With the pike-grey uniform color, the ACW look is hopefully less obvious.


Next unit completed (actually, I just added to it) is the 13th Foot, ex from the Caribbean thus the white shakos.  They were given the standard black ones within a short time after arrival in Canada for the War of 1812, but that shan't deter me from painting up such a distinctive unit.  I use units such as this for the "big battalion" games/rules ('Black Powder' is a better known of these) with units utilizing 24-36 or more figures in each.


Finally we have an example of the "big battle" unit.  . Each element is a representation of a brigade of troops. Yes, we do use a high ratio of figures! 10 = 2500 or so.  Past posts of our large Napoleonic battles will see that on the table this actually works visually also even with 28mm. 

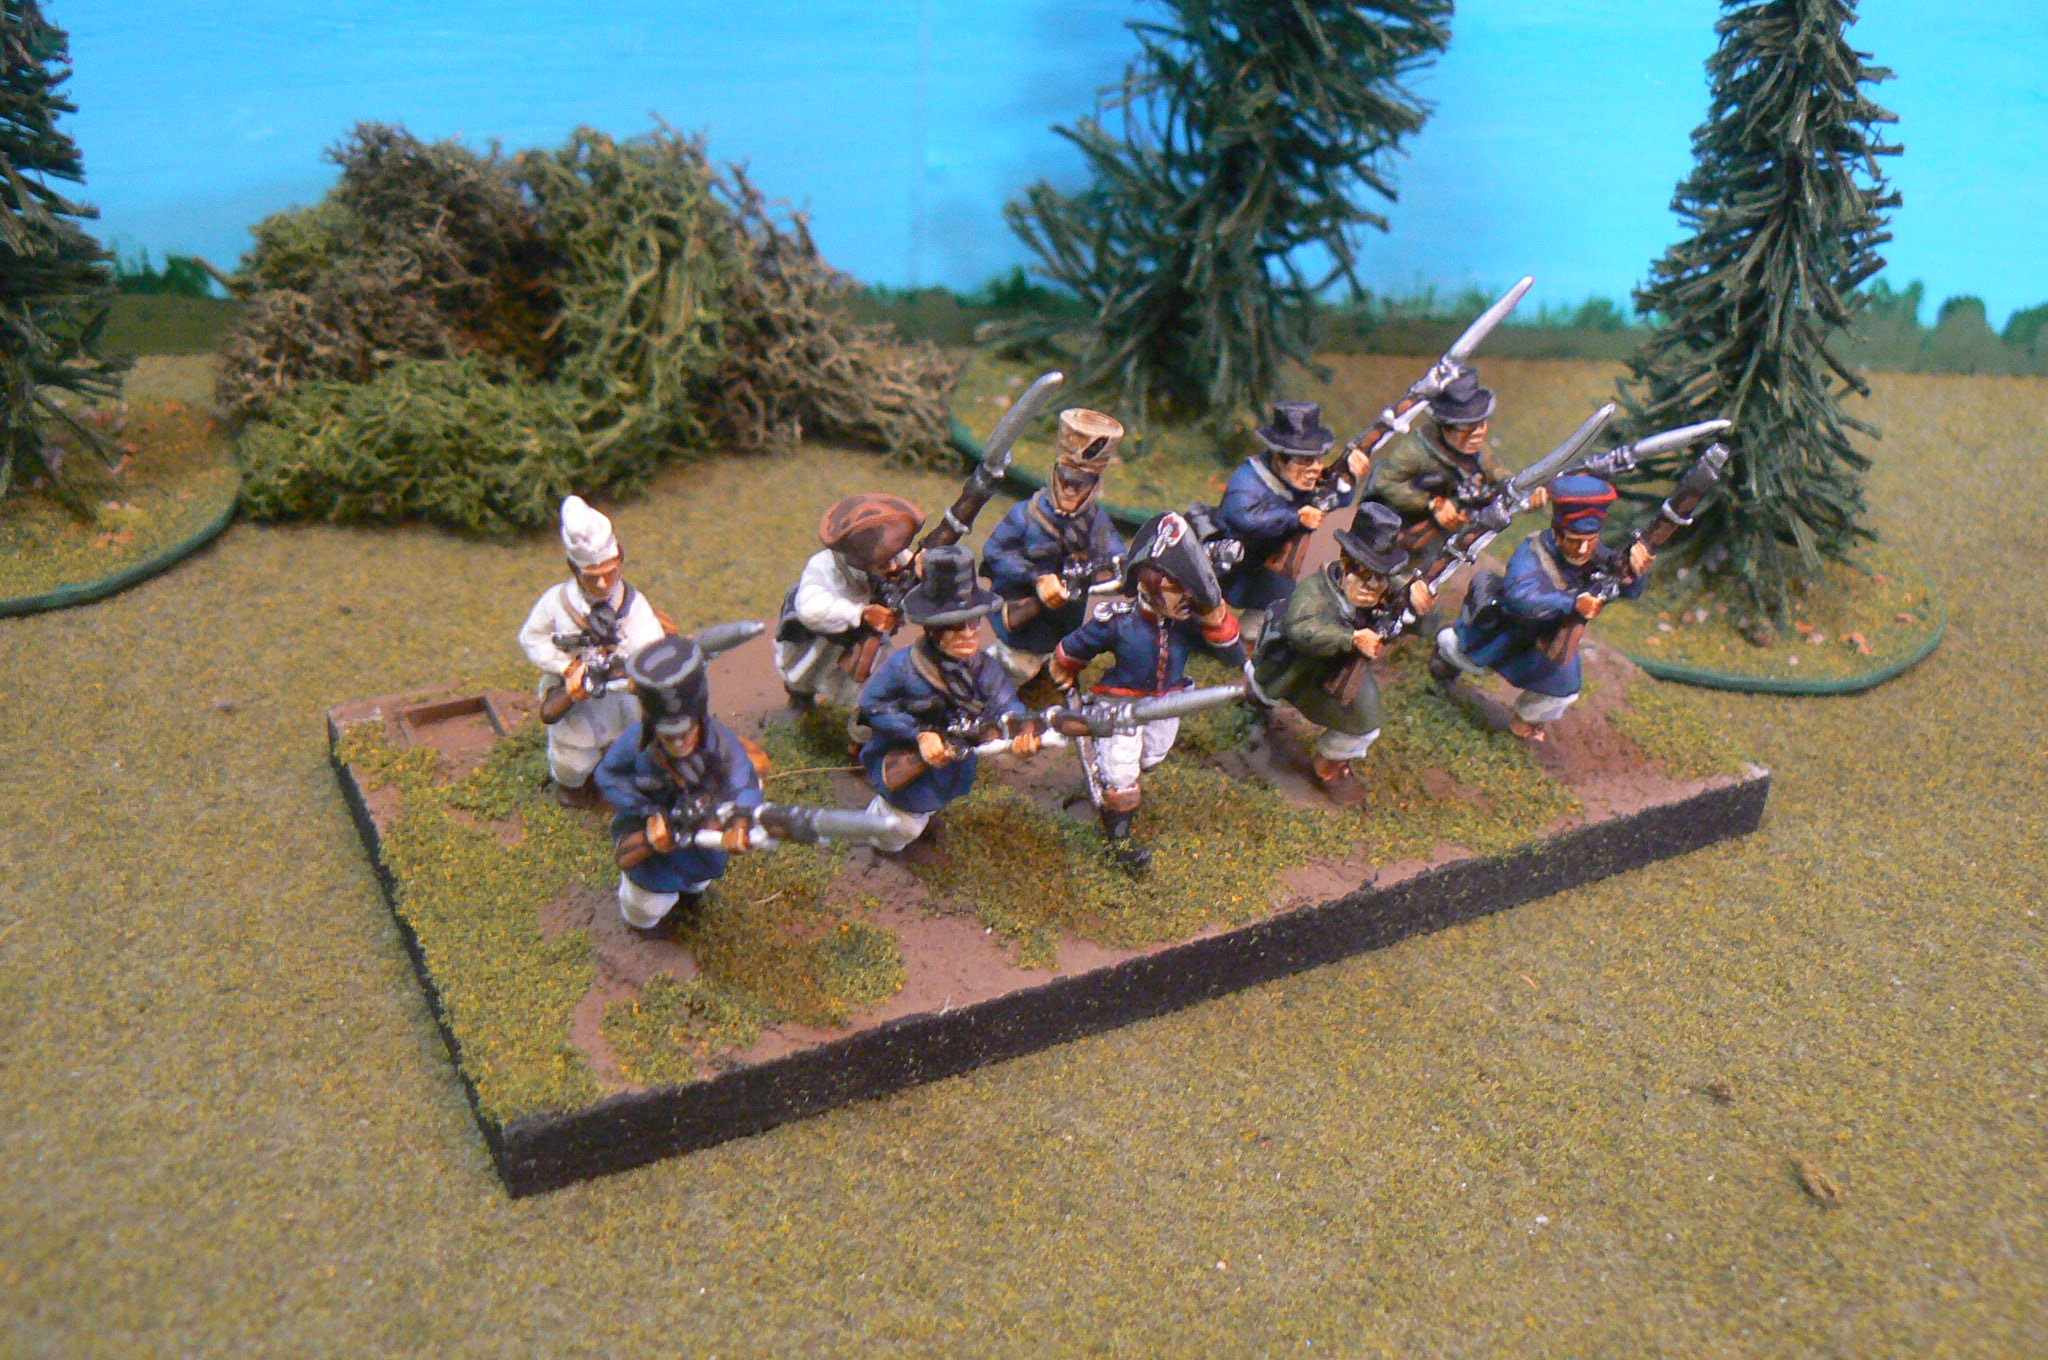
This one recently painted, represents the French National Guard of 1814 After years of massive losses, The French state/Napoleon, was reaching very deep in the conscription pool and young boys and civilians were called up to contribute mostly without uniforms or equipment.  These examples are from Old Glory's 1812 American militia pack which look to wear the common French blouse.  I have replaced with a spare shako or forage cap which might have been the only vestige of military dress they wore.  In the rear are two in baker's smocks made famous from actions in the 1814 campaign for France.  Based for our rules, which are similar to 'Blucher'.  


from F.-G. Hourtroulle's '1814'


Sunday 3 January 2021

Battle of Bunker Hill, War of 1812 style


“Sir, the American militia have occupied the heights on Breed’s Hill and have fortified that position”

“Again?! almost 4 decades later?” the British General Howe III decried. “Well let’s do it once more!”

Playing solo with rules I have created for my own benefit, I amended the scenario of this famous historical battle slightly by having naturally less troops but proportioned correctly) and the ‘landings’ as a bridge crossing.  The later ‘Third Wave’ historically landed on another beach closer to the action so on a ford in the stream, but in the game these were delayed (by dice rolls) and ultimately were not needed (spoiler!) 

The Right Wing consisting of the 1st, 49th (in my green-stuff grey greatcoats), and 104th Foot regiments along with a contingents of light troops formed up and marched straight at the Kentucky Militiamen arrayed along the stone and wood fences.  While inexperienced soldiers, the Americans historically produced a lot of firepower which I gave them in this game.  They stymied the British attack before it could be pressed home.  While the Lights and the 104th made most undignified exits from the field, the 49th and 1st, despite heavy casualties rallied to the rear to redress their ranks.  

Meanwhile the ‘Second Wave’ crossing the bridge/landing were a small unit of 95th Rifles, the 41st Foot, the 100th Foot and the 2nd West India Regiment   Forming a line from left to right, The Rifles were tasked to eliminate or neutralize the American skirmishers in front of Charlestown.  The 41st deployed in front of the Redoubt took some long distance fire which served to place much caution with its commander ( this became obvious from its poor dice for ‘motivation’!) .  The 100th Foot had no such hesitations and very swiftly advanced to the American entrenchments avoiding the worst of the musket fire and quickly overwhelmed the defenders!

With the West India Regiment following, the British promised to exploit this hole in the middle of the American position.

While this battle winning attack was conducted, the Right Wing, albeit severely depleted but in the spirit of the original British soldiers in the historical battle came on the American positions once again.  However, true to form, were shot up and were forced back once again.  

In the middle, reinforcements from Bunker Hill finally started to arrive (again dice rolled), one unit heroically advancing in the maelstrom despite casualties from British long range cannon. (during the AWI battle, this was from shipborne guns but I just had any rolled 1 create a stand loss).  With the seeing-off of these only troops available to plug the gap, and the troops in the Redoubt legging-it despite my ‘order’ to hold the fort! (love the dice) , the American Left Wing along the fences decided conduct an orderly withdraw.

Thus ended the 1812 version of Bunker Hill.  Rather like the first one actually.  

The British Right Wing advances

The Kentucky militiamen line the stone fence (most of the figures seen in this battle are Old Glory 28mm.  The British flags Colours are hand painted (before one can buy all those beautiful printed versions! Now I have to continue this for visual consistency)

Rather nervous looking militia holding the Redoubt

The British Left Wing readies for its assault on the American fieldworks

The 95th Rifles facing the US Rifles who are in this guise, mere militiamen

The 104th Foot advancing swiftly 

Crunch time and the battle in the balance.  The veteran British would quickly take the American works at the point of the bayonet.