Thursday 27 December 2018

Cavalry for Waterloo


Once on roll, I continue to gather figures until…. well I was going to say “until it gets ridiculous”,…. but I often even go beyond that.

With plastics and all the conversion possibilities which I enjoy creating,  I have now have a sizeable force of Napoleonic cavalry to do battle with each other and to fill in when necessary for our bring-what-you-can games.

Newly created British 16th Light Dragoons.  Selected as they were the among the first of the Allies to come to the rescue of the British Union Brigade after their famous and foolish charge early in the Waterloo battle. 
All my units on 'parade' (except for the tardy Belgian Light Dragoons to be painted)
French Chasseurs (Perry plastics)
French cuirassiers
Dutch Light Dragoons made from various plastic bits (early British bodies, Russian shakos, French plumes and medieval horses....)
a single unit of French Hussars.  
Another view of the whole lot with the Allies to the left and French on the right.  All plastics.  I might blow out a back disc if I were to carry it all if metals!


Tuesday 11 December 2018

"Is this not the same village, Francois?"

...."Ah, all these Russian villages look the same in this d*amned snow!"

photos from a replay of my Retreat from Moscow game on Monday night


bands of angry Russian peasants

Saturday 1 December 2018

Retreat from Moscow - the game


Well after a vacation to warmer climes, what type of game would you think I would like to do?  Something with steamy jungles? Perhaps an amphibious landing on a nice tropical beach? No, I decide upon the frozen tundra of Russia….. and the famous Retreat from Moscow of the Grande Armee!

To be honest, the vacation had little to do with it.  It really all started with a large white tablecloth I have had for years, and a chance encounter with WillB at the club when he was selling (giving away, really) some of his Perry ‘Retreat’ figures.  I couldn't resist. When I heard that the Seattle convention of “Enfilade!” theme is to be ‘Winter’ , well…….heck.


With my interest, Will later traded with me some further of his Retreat collection…seeing my weakness :}

The Perrys do packs of six foot and three horse, so I choose to continue that organization of units as not to make the whole project overwhelming.  In any rules, you can have various means “stretch out” the elimination of figures/units and I did not see the need for masses on the table.  This game is to be a lonesome party of stragglers in small units seeking a different way home from the mass of the disintegrating French army.

Because of the small numbers, or perhaps because of them, I saw this as another of my “convention games” to be played in a noisy environment by a bunch of guys not necessarily up on any particular rules or even the period at hand.  Certainly I feel overly complicated and ‘accurate simulations’ don’t really work at big events so I opt to simple and easy to command rules.  This often means I will need to make them myself to fit the type of game and the numbers I have.
So, in this case, while the Russians (mainly peasants as that is what I ended up with) could be commanded indeed by other players, it proved interesting putting them on “auto-pilot” by using a chart and basing their ‘commands’ on proximity to the enemy and a die roll to see how they react.

The rules, brief as they were, with myself putting in about a half hour of thought were kinda based on the ideas of Lion Rampant (with low amount activation, differing hits equal casualty amounts and differing abilities).  **spoiler - they proved to work very well indeed.
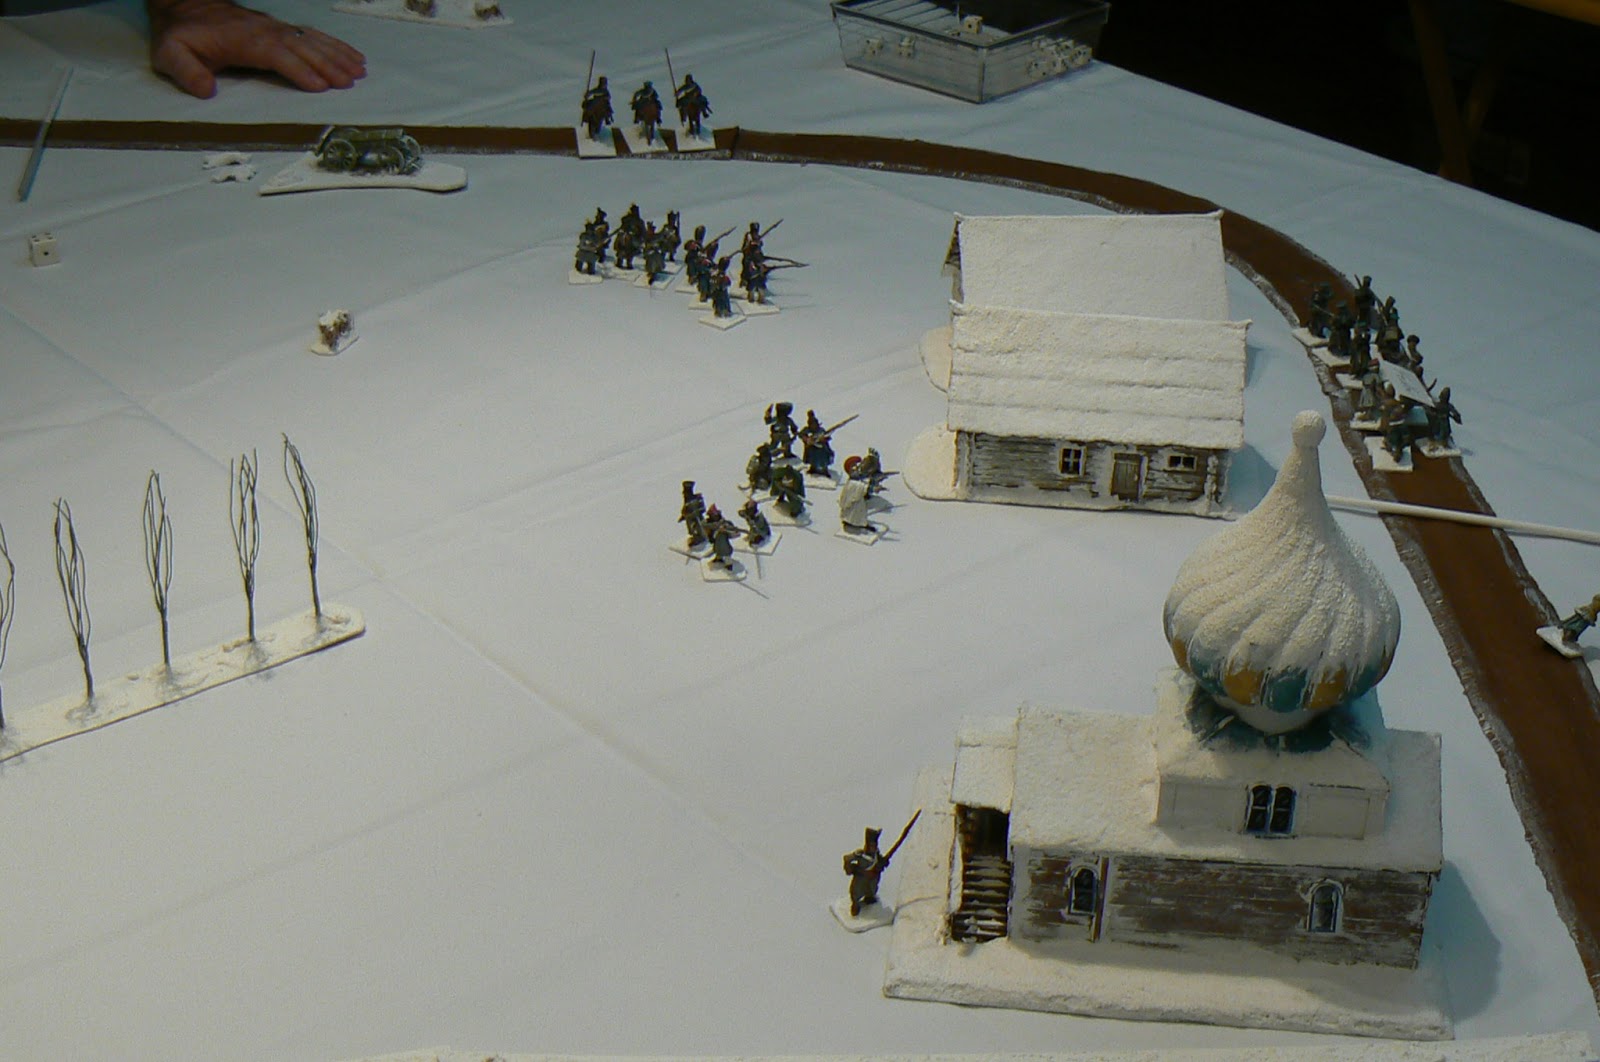
The individual groups of survivors make their way past a lonely Russian village through the snow of a Russian winter.....

Of course the other things to create the game are the painting and the terrain.  The painting was necessitated by Will’s units already done.  But this actually proved a blessing because while not my usual style, it gave me inspiration to keep it simple and basic.  Then, from examples of other painters of frozen conditions, dry-brush a light grey over all areas to give them a ‘cold’ look.  Thus unusually for me, I have another’s painting in my collection.
The 'Poles' leading groups of French dismounted cavalrymen and French infantry towards the lone bridge and survival
Russian Jagers behind the houses of the village.

As mentioned the ‘mat’ is a white tablecloth I had.  Not realistic, but practical.  The Russian houses were plastic ‘Pegasus’ types previously painted by me but not to my satisfaction so they were very much “re-purposed” covered in white paint and model snow.  The Russian church I had built a while back (see: my previous post on the church build)  also became “re-purposed” and covered like-wise. Undeveloped x-ray film provided by a doctor gaming-buddy of mine years and years ago (obviously as they are now have been digital for decades) provided the cold water stream.

OK, the game.
Firstly I told Will, Jim and Peter there are no morale rules.  Units can fight on until all the figures are eliminated.  The rational is thus:
“In these frozen winter depths of despair, if you surrender the enemy will certainly kill you.  If you run, it is into the white wilderness.  To give up is to die frozen.  The only option is to keep fighting until the bitter end or continue your trek home….”

Having no morale in the rules, certainly makes everything a whole lot simpler!

While not really ‘morale’ I put in a simple rule that units sustaining the most casualties in combat or any from shooting will retreat back a full move.  That simple rule, ended up to be used tactically by the players to ‘push’ the Russians out of the way in many cases thus shooting but so losing a turn of movement just to clear a better path.
My repurposed church and leafless plastic trees in the background
Movement and shooting distances are determined according to my painted wood dowels.  Surprisingly the only things NOT to chance within the game!  And, of course, painted as to 'blend in' to the terrain.  My OCD of wargaming.....

The winner is the player with the most figures off the far end of the table.  Jim, selected the mounted French contingent and the ‘Remnants’ (of the GrandeArmee) .  His cavalry raced literally directly through the countryside so having the terrain potentially causing harm.  But as I was rolling.... and sixes were needed, so he worried unnecessarily….( I think at one point I threw 48 consecutive dice and came up with only three individual 6s and so not enough to wound, let alone eliminate a single figure….)

Jim sat back to watch Peter and Will leap-frog each other, fighting off the peasants and the much tougher Russian Jager regulars.  Yes, the Cossacks were there (of course!) but insisted to but be merely be a presence and only coming into range once to be shot up by Will’s commanded ‘Old Guard’.  Surprisingly to all the players, after initial fears of being slaughtered, Will and Peter exited with the same numbers as Jim so all were considered survivors …until perhaps the next village is encountered!
The "Old Guard" appropriately providing the final rearguard.

Some good ideas for further betterment of the rules were offered and so I will go into the next game with Version B and knowledge it will probably work for a good game and entertainment of the players.


Thursday 1 November 2018

Torso Lust


You have some lovely left-over torsos.... and some cavalry trooper legs extra from constructing plastic horsemen ....and you are thinking they would make a wonderful second unit, but you have no further horses…..

Perry Miniatures cleverly offer separate horse sprues and so I ordered some of the British Light Dragoons horse sprues that I might create the 5th (Belgian) Light Dragoons for the Waterloo campaign.  The Perry horses sport plain blankets without the usual shabraque (the long pointed saddle cloth of British full dress) so can be used for other units dressed without that piece of kit.

However, once they arrived, I noted/remembered that the models do sport the historical British trait of ‘docking’ or trimming the tails of their horses.  But the Belgians did not.  So out came the “green stuff” epoxy putty to fill out the tails.  I also needed to cover the ‘indent’ in the front of the right-side region of the saddle where the British would store the carbine but that I did not use, as the Belgians would instead attach the carbine to their shoulder strap in French fashion.
Rather fuzzy photo but the elongated tails and saddle "repair" work can be noted

These are on the a-list of units to paint…..

Saturday 27 October 2018

Tercey Campaign Re-ignites


After we left the last battle in this fictional campaign in a distant shire during the English Civil War, the main contestants swept through the region, taking with them many of the fighting forces for both sides.  After many months of peace,  the shire saw the return of the Earl of Rockforth and the return of strife in the Shire.

Lord Brooke was by now burdened by ill heath but still formed the main opposition Rockforth’s return.  He funded the first military response by authorizing the ambush of the Earl which was conducted near Sheppard’s Farm.  While few good units were yet available, Longe’s musketeers were a solid unit.  Ballard’s Shotte were thought to be a poor unit, but as we shall see, they performed admirably during this engagement.  These Tawney troops along with a small cannon and Lord Brooke’s own commanded shot, sought to delay or even defeat Rockforth’s army.

To that end, Longe’s muskets were placed in the woods with Ballard’s Shotte on the hill with the small cannon on a mound opposite.  The commanded shot held the rear of what was essentially a box into which the Earl’s troops would enter.
The Earl's army along the road, the small cannon to the left, Ballard's Shotte on the hill right and Longe's seen in the large woods

The trap was set but would require good timing.  The signal was to be the cannon but in good “Rampant-y” style it did not fire!  Ballard’s men who could see the gun also did not fire (they also failed activation) but Longe’s musketeers hiding along the woods edge, who had already allowed the Earl’s sedan chair to pass, grew impatient and Longe allowed them to fire at Hampden’s passing regiment.

Longe's ambush


The Earl’s army, shocked but not disordered, readied themselves.  Longe was to “shoote and scoote” but decided on another volley but the hurried order had the result of a half-hearted effect but it was enough for the Hampden pike to withdraw.

The small cannon finally fired and the shot barely missed the sedan chair. [ I made it that 4 hits were necessary to kill a horse or damage the chair in some way, 6 hits would kill the Earl ]

Hastings, leading his cuirassiers, finding a target for their wraith, charged Ballard’s Shotte but Ballard’s men surprisingly only moved back from each charge in good order like veterans  [ their ‘courage’ rolls were 11 or 12 on the dice throughout the battle! ]  but finally needed to retire to refuge of the chavel de frise of sharpened stakes which was their handiwork the day before, allowing them to fight off the pursing cuirassiers who finally evaporated in exhaustion.
Ballard's Shotte prepare to meet Hastings charge
Chased but not beaten, Ballard's Shotte defend in the Cheval de Frise (plastics tree forms by Woodland Scenics)

The Earl’s transport, now under great control by his retainers (rolled a 12 for activation move) moved the the protection of Hampden’s Pike and ordered them and the nearby pike of Robart’s to “take the Godd**n cannon!”

Startled by the reappearance of Longe’s Musketeers who had previously moved through the woods and were now supporting the cannon, Robarte’s pike stopped as did Hampden’s musketeers behind them for a few moments allowing the cannon to either again fire ( and probably be overrun ) or to withdraw.  I rolled for their decision and they took the “save our butts” option.

We have had heard little from Lord Brooke’s commanded shot unit as it would continue to fail all of its activation rolls. Even when the Earl’s chair was passing by inches away, no orders were given.  Perhaps the officer was an Earl sympathizer?
Another failed activation by Lord Brooke's purple clad commanded shot
However Ballard’s men were not so complacent about the battle ending quite yet.  And while Hampden’s pikemen congratulated themselves on the capture of the small cannon and Longe’s musketeers expended the last of their bullets with the bulk of the Earl’s army,  the grey clad musketeers charged at the sedan chair but narrowly missed capturing the Earl.  But with that the battle ended.
The Earl’s arrival to the Shire was not the easy affair he expected.

Footnote:
The officer of the Commanded Shot which did not perform well was cashiered from Lord Brooke’s employ for failing each and every activation roll.
He was found dead two days later of a self-inflicted gunshot to the back of the head.
Hopefully the commanded shot will have better dice in the next battle.


Tuesday 23 October 2018

Sprue ‘bricks’


"Very cheap, mindfully fungal, rather clever, playfully recycling or just a freaking waste of time"?

 I was wondering which of these characteristics do I evoke in myself,  clipping away at the empty plastic figures sprue I was holding, to create small scale bricks for the time, in the indeterminate future, when I might want to make a destroyed building and mix them in with the accompanying rubble......

Monday 22 October 2018

War of 1812 - a fictional affair


Battle for Sheppard’s Bridge - fictional War of 1812

American General Jim needed to capture the important bridge near the Sheppard Farm to continue his advance into Upper Canada during the War of 1812 in this fictional affair.  The British commander Kevin was to hold this advance with his British and mostly Canadian contingent.  Both sides were populated with units of dubious quality militia.

Kevin, hearing that the rules were based upon the excellent “Loose Files, American Scramble” rules by Andy Callan, and knowing the strengths and weaknesses of the various qualities of the troops,  went for a ‘defence in depth’ strategy remencent of Greene’s deployments in the American Revolutionary War and so created lines of units with his best in reserve.

Canadian militia line the fence, the Glengarry Fencibles behind and the greatcoated 49th Foot in the rear.  The successive lines of the British defence.

Jim meanwhile, in the attack, concentrated the Kentucky frontier militia on his left, while he lead his regulars, many of which were the usual poorly trained stuff of the American early war efforts, on the right of the large field which dominated the centre of the battle area.

The American advance of their Right. The militia lead.  My newly painted 'sky' backdrop employed.

The Kentucky militia perhaps evoking their constitutional rights to only defend the territory of the United States and not invade Canada, or were having internal debates or in-fighting, nevertheless refused to advance and indeed removed themselves from the action altogether before even engaging the enemy. (hard to get the militia to do much and Jim’s abundance of 1 rolls certainly did assist in their rapid dispersal!)

The milling Kentucky militia.  Their disorder displayed by the 'cannonballs'

With that flank stalled, Jim continued his advance by units on his right until the final effort to take the hill before the bridge.  The US 16th Infantry Regiment lead the attack against the defending British 13th Foot.  While engaged in an equal battle for the hill, they were joined by additional forces from both sides.  The British barely came out the victors.   With that, the American effort was thwarted.

The critical fight on the hill with the 13th Foot still wearing their white tropical shakos.  (In reality, these were quickly exchanged for the usual black shakos, but they are just too cool not to not represent!)
both sides add to the combat

Monday 8 October 2018

GaPa again!

Another Saxon/Russian GNW defeat!

Excited by each of us increasing our GNW forces, KevinA’s Swedes, WillB’s Russians, and my Electorate Saxons, another battle at the club was scheduled.

In many ways it had a similar theme as our previous battle, having the Swedish elite cavalry exploit the woods on the left of the Russian/Saxon line to outflank and roll up the allies line.

A bird's view from the Swedish left.  The Swedes are deployed to the right with the elite horse in three unit column in the far distance.  The Russian/Saxon alliance is holding the fortifications to the left with the Saxon horse moving around the woods to counter the Swedish advance on their flank. (photo by Kevin)  
The Russians on the right flank advanced without opposition hoping to attract attention from the Swedish in the centre but failed to do so, while the Russians of the centre were unwilling to abandon the defensive positions to attack to the left.   The battle concluded as the Saxons holding the left collapsed, but as the new Swedish Guards failed to advance further under artillery fire in their first time under fire in the field of battle after being proudly painted by Kevin, he was not able to attack the vacant middle of the Allies line allowing the Russian forces to escape intact.

My Saxons in position....
....however they are forced to reposition to the left.  Not done in my usual technique, these are painted in a style to compliment the others collections.
Saxon grenadiers.  These are from the old Wargames Factory sprues. These have a third of the figures having half torsos and lots of arm, weapon and head bits so allowing such fun options. The Warlord version does not give these options and is much the poorer for it (as well as your wallet!)
The 'left' woods, the scene of most of the action
KevinA's Swedes including his CharlesXII command stand which includes a poor Russian soldier getting his buttocks attacked by the dogs! 
And WillB's stoic Russians in the fore, Kevin's Russians holding the entrenchments.  Our collections are primarily Warlord/Wargames factory plastics along with some Old Glory and Warfare miniatures. 

Cheval de frise


A couple of wargaming buddies started their new c.1706 Great Northern War project and I finally could not resist joining in.  One of the few conflicts I have little knowledge, brief research had me going to collect forces of the Electorate of Saxony which allied itself with WillB’s Russians against KevinA’s Swedes.

Apparently not too confident about defending against the aggressive Swedes, it was common for these early 18th C Saxons to employ these spiky defences along their whole front.
my finished examples on the tabletop

While I have a few of these in metal, I felt I would need more.  Inspiration had me look at the used sprues of the cavalry and plastic toothpicks bought cheaply at the dollar store for a very inexpensive solution as the following photos illustrate.
Metal version (manufacturer unknown)
Pieces of the sprue cut off. The two will be then glued together to form a square post.
Plastic toothpicks. The ends are cut off to length.  I used only the red ones!
All glued together.  The model glue melted the plastic to allow the toothpick ends to remain upright with only a couple moments of being held in place to my surprise
Primered in black, now looking the part
Finished version.  The figure is a Warlord (nee Wargames Factory) plastic WSS era horseman. 

Tuesday 25 September 2018

Escort Duty


1815 era Dutch-Belgians playing on the French side!  (my plastic conversions)

Surprised no one wondered why cuirassiers, hussars and all manner of horsemen were tasked to escort wagons but such are questions best unspoken when a scenario must be designed with only a vague idea of the number of players coming.  However the “escort the wagons” is always a good option for any era.  As the game was another “pley-test” of  “Hussar Rampant” it was all horse using every painted unit available, both my French and Dutch-Belgians and WiilB’s borrowed Russians and French Dragoons, giving the 8 players three units each.  This was to be the largest of the games so far at 24 units on the table.
Chasseurs on escort duty

Also testing the rules was the utter mess of deployment,  with the French escorting the wagons and  units helping from the town and against Russian forces coming in from all angles from the random diced approaches which inevitably creates a bit of chaotic action.  However if this confusion still has the rules working despite unique or challenging situations, then it might survive any test.
The usual combats in all directions.  In this case, all cuirassier action!

So it was that the game had the wagons almost within range of the town and causing some of the Russian players bemoan the task unaware however that at 8+ activation, the wagons would be hard to move along.  DaveMc wanted the cossacks  in order to burn and loot (and not just capture) and surprisingly used them ‘cossackian’ style avoiding most contacts but as their real-life counterparts, were a quite the nuisance.  The cuirassiers both Russian, under the able command of ChrisO, and French ones, were hard to kill, and the lancers with their ”pointy-stick” bonus had a big punch.  The lights and hussars, with greater movement rates, could dance around ( or should!).
units are standardized 6 figure units
Russian overhead perspective with ChrisO's view of the battle

The wagons, safe for a while, but with French losses and little movement, they inevitability were captured or in one case, burnt by cossacks.      
This, and the following pic, shows an interesting combat three of my Dutch-Belgian units against one Russian cuirassier formation. As usual, my dice again profoundly fail me and the armoured Russians prevail...... !!