Showing posts with label Napoleonics. Show all posts

Tuesday, 11 April 2023

new Napoleonic "reinforcements"

 While I would love to add these to my beleaguered Russian Napoleonic army as reinforcements in the current campaign I am engaged in, they will need to wait for later games,  but do form the basis of Baggovout's Corps at Borodino.  While the Russian infantry uniform had possibly only the shoulder strap color as the only major difference between regiments, the flag design is the main feature denote his formation's regiments (for those regiments of mine which are lucky enough to gain a flag if I have one available!).  Each of these stands represent a brigade and are represented by one of the regiments within that formation. 

The French of the Russian Campaign also gain reinforcements in the form of the red-coated Swiss of Oudinot's Corps, which, while it did not fight at Borodino, I did as I love the color red and they have been on the bucket list to paint.  The Perry pamphlet enclosed in their earlier war uniform plastics box is an excellent reference source.  Each of the Swiss regiments had a slight difference in dress, not only in the facing color but of the different plumes and distinctions of their voltigeurs and grenadiers to make painting interesting (and longer).  The pamphlet also has information on many of the other nations and French formations wearing the open lapel tunic including the Italians, white-coated French regiments, the Paris Guard in Spain among others as well as flags for many regiments. Even if you don't do plastics, ask for the sheets from a friend who does!


Sunday, 9 April 2023

an Austro-Hungarian Landwehr action

Brought out my only "Austrian" Napoleonics for a quick solo game,  The "Hungarian Militia" are now sporting proper shakos while their former headdress of corsehuts hats now are adorned by the "Austrian Landwehr" wearing grey uniforms. The scenario was simply to have the French get to the brewery, load up the wagon full of beer and get back down one of the roads. The Austro-Hungarians were to approach from the east to stop them from doing so.

They are up against my dismounted French Dragoons.  I wanted to use the dragoons on the table as I recently added a horse-holder group from Brigade Games.  As not sure of the compatibility with the existing Perrys ordered only one group; and while the uniforms are early vs late war, the sizing is close.  

The discouraged French dismounted dragoons (indicated by the newly dug grave marker!). Showing the Brigade Games horse-holders 

The rules I made up on the fly, were a simple 6+ activation with 6s hitting or combat, with units in cover needing an extra hit to kill and the Landwehr in close order 5,6 =hit in close combat.  This simple system worked well as I couldn't be bothered to put down my beer to find the proper rules. 

The confident French marched from the west while the sweeping advance through the woods on horse quickly stalled from good musket fire from the Hungarian militia along the wicker fence line forcing them off their horses and into cover. There they would remain pinned.


The other south unit of  Hungarian militia also kept the French elite company pinned. The Landwehr urged on by their aggressive officer on horse, moved down the road from the east in close order (their permanent formation as I have the miniatures in very close together on their bases!) to charge into the dismounted dragoons and put them into flight.  The other French lost heart and the Austro-Hungarians celebrated a grand victory. 

As it was the Austrian Landwehr unit's first battle being newly recruited and all ( in other words: painted), it was indeed a surprising outcome.

Austrian Landwehr in close order down the road. "Victory is at hand!"


"Battle of Pont Heinz"

 The battle is named for the bridge in box 57 of the campaign map in Peter's 'One Week Campaign' Napoleonic clash with Craig taking the French, while allies KevinA takes my Prusssians and I control the Russians (combined as the "Ussians").  This was the first and so far largest of the clashes which had high hopes for the Russian commander to pincer and destroy the bridgehead over the border river made by the French Guard and Ney's French Corps.  

While very familiar with these rules (as I helped to create them...), I have no command success with them, having a combination of, let us say, no subtlety in my tactics and bad rolling with the dice. "If I didn't have bad luck, I wouldn't have any luck at all!"  Needless to say, with the good management of his forces, including having Poniatowski's Polish Corps come to flank my left hook by Tuchov, and having all my artillery eliminated by the accurate French counter battery fire, the Russian heavy horse broken apart and my infantry thrust to the bridge halted, essentially the Russian army was destroyed on the first day.

Poniatowski's Polish made from Muraski Miniatures and Victrix greatcoat plastics with 'campaign' caps from their Guard Lancers pack. I also created a French uniformed Polish brigade with brown trousers and white cap covers as the 4th, 7th, and 9th Polish infantry regiments were recalled from Spain to form a brigade in the 1812 Russian invasion.  The leader himself is a partial creation by me, as are the hussars in the back. 

Peter uses coloured discs to denote losses either permanent (reds) or temporary for Campaign purposes (blues) which can be recovered thereby allowing forces to be available albeit weakened for later engagements. 

However, I still had my 'end-around' attack in which I send Borozdin's Corps on a roundabout two day journey to attack the French capital from the north.  Strategically I was hoping to either a) take his capital by surprise,  b) capture and hold a town for campaign points or c) and, more likely, have some of Craig's reserve formations move away from the Prussians there by allowing Prussian success in the main theatre of action.  This plan worked too well as the French moved Milhaud's Heavy Cavalry Corps and the Imperial Guard Horse (!) against me. While holding off directly attacking me during the latter part of day two at the important French crossroads town, his horse artillery was active while all I could do is form a defensive perimeter maneuvering slowly as my die rolling (of course!) was always low to prevent too much activity - blame it on bad Russian staff work?  

Craig also cleverly moved the Italian Corps onto my rear in the morning of the 'next day', cutting off supplies (thus my important ability to recoup attrition losses) thereby completely destroying the surrounded Russians.  While the strategic goal was only partially achieved having some of the Italians hurt, so ended the Battle of Quartre Jambre.  

The campaign continues with the Prussians engaging the French


Saturday, 28 January 2023

Various Games

This post is a bit of a photo summary of the various collections and play in the past while. ("various" is a definite theme of my hobby) .

Napoleonics:

A practice game for the boys as we set up for a “One Week Campaign”.  This was a 1805 scenario from a Shako rules scenario book but readily enough converted to our home-brew set.  It was fought over the holidays period during a day our gaming group all had available.

Prussians advance

overview of the battle with French in the distance holding off the Coalition forces waiting for the Italians to come in from the flank but across a river and through a woods

Italians make their way encouraged by the commander. The small black dice represent current combat strength.

A Canadian Affair:

Not really noted for armed conflict fought on its own soil, Canada did have the Northwest Rebellion during 1885. Certainly not much of an affair, but does offer inspiration for small skirmish scenarios.  That the rebellious Metis and native Cree choose set piece battles obviously outnumbered by the Canadian Militia forces rather than ambush and hit-and-run is interesting. Solo play using “The Men Who Would Be Kings” rules with half-ish unit sizes - usually the Metis have no figures on the table at all. (as I don't have any...)

Canadian militia advance upon a suspected Metis position across the creek.  (Perry ACW plastics mostly with new headdress additions - either their Home Service helmets or my 'green-stuff' glengarries.


Northwest Mounted Police in 'full dress', cross the stream on the dry open prairie.  Perry ACW plastic cavalry converted with new arms, heads and detailing.


Sinai, 1956:

Result of an estate sale, I came in possession of 15mm T-34s and Shermans. I have no other armour of that scale and those two particular model of tanks did not fight each other during WW2….but I did discover that during the Suez Crisis, clashes occurred between Egyptian and Israeli forces using those respective vehicles. Using “What a Tanker” rules.  

Egyptian and Israeli tank forces clash near a Sinai village. The destroyed Sherman is a result of my putting on the two-part tracks incorrectly.  By the time I discovered my error the glued had melded the parts together as to create too much damage while trying to pull them apart; thus INCREASED the damage to create this terrain obstacle.

The fingers are handling my conversion of a straight up Sherman into the Israeli M-50 (Super Sherman)
I used the WW2 "Sherman Firefly" stats which I think replicate the power of the gun for the game.
Noticeably in WaT, tabletop distances between tanks become very close indeed.(note my Israeli tank colour is much less green than my camera would suggest!) 


“On Folium III”  

On a distance verdant planet, humaniods long exposed to an enzyme which turns the skin a blue hue and creates over-developed muscles, fight ‘Raptors’ a reptilian species especially deadly and aggressive. Think: Schwarzenegger as a “Rouge Trooper” in Jurassic Park.

Using new “Xenos Rampant” rules. 

old style 40K "Catachans" recently painted using inks. 

"Oh sh@t!  Where did she come from!" Raptor by Wizkids.  Some time ago I bought 2 packs of these (4 models) as they are VERY nice models BUT had no idea what I was to do with them! However in Xenos Rampant these four can form a potent 'detachment' or table-top force of 24 points by themselves!  


“The ‘Incident’ at the Outpost near Plotnaty”

During sometime in the future, the U.N. was allowed to set up observation posts in the Donbas Region.  But this peace was quickly swept away as the outpost of U.N. blue-clad soldiers were attacked by “Russian” forces.  Used the new “Xenos Rampant” rules.  The “neo-Russian”/old 40K Valhallans mortars (artillery) proved exceedingly (too) powerful but the rest works fairly well.  

After-action photo as,  in the game, the "Russian" units did not need to close assault the outpost. Old-time Valhallan 40K figures painted by me A LONG TIME AGO.

The outpost. My scenario had the three U.N. units randomly placed at tents around the fortified position so not to immediately be in position and so must activate to move or shoot.  However the rule modifications I added gave them no cover at all to oncoming artillery rounds within the outpost and so the bright blue troopers died (too) quickly.  The "U.N Troopers" are old GW Imperial Guard Cadians with symbols removed and given the characteristic United Nations bright colour with camo uniforms.  I gained these, in this case, from the local club's Door Prize winning ticket but had, at the time no need for them nor any want to expand upon them.  Having seen a photo of U.N. troops, I thought to use them as a very small, under armed (no heavy weapons) contingent. They had been sitting, thus painted, in the box for years.  Now with Xenos Rampant I can use them as a complete force.

While not used in the game, I have two fighting vehicles for the Valhallans/Neo-Russians in the form of two 1:35 scale WW2 KVs modified with the ridiculously oversized 40K weaponry.  In this case, should I ever play old style 40K I could use them as a Leman Russ and Chimera respectively.  They are given a sloppy covering of whitewash in keeping with the winter Russian-y theme.


Saturday, 19 November 2022

New Napoleonic units- Duchy of Baden

Finally got some units painted recently.  Two more Duchy of Baden formations. These are HaT 28mm figures originally late Prussian infantry.  HaT has a limited range of 28mm in hard plastic in addition to their usual 1:72 scale. The heads seem too small for the wargamers 28mm so spare Perry heads were added which brings them more in line with the rest of my collection. 

The Badener Lights in green wearing both their 1813 shako (left) and some with earlier helmets (right).  The Baden Grenadier Guard are on the right wearing their full-dress bearskin headdress.  


Tuesday, 23 August 2022

Chattanooga - Napoleonic style

 Having the guys commit to a full weekend, I set up a secondary game should we need in addition to the larger affair earlier (see post: the big game  ).  I set up a 'bathtub' version of the American Civil War version of Chattanooga.  

In this scenario, the Union would have the advantage of not only the numbers historically but with the rules, multiple commands giving much better tactical maneuver.  The Confederate commander would, regardless of the position of his General, have most of his spread out troops out of command radius and thus less likely to be allowed tactical positioning.  He would be always be forced to only command those troops most needing and leaving the others to the tender mercies of the opposition. 

The scenario roughly follows that of the historical battle.  The Confederates had the Missionary Ridge position in the centre with slightly forward positions of Lookout Mountain on the left and Tunnel Hill on the right held by, in our game by the Brunswickers and Highlanders respectively. While the Dutch-Belgians held the centre ridge. To represent the unexpected rapid collapse of the Confederates on the ridge, I had their combat rating undetermined until contact so even their commander would not know how much they could be relied upon. 

The Union were in three commands: Hooker with his Westphalians would attack Lookout Mountain; Sherman and his Napoleonic Minor States contingent would attack the Highlanders representing the steady troops of Cleburne.  In the middle under the fortifications of Chattanooga was Thomas and the artillery.  In the actual battle a portion of the troops would make a demonstration on the lower slopes of ridge, get shot at and as a un-commanded response charge up the hill and rout the Confederates! I had Thomas' troops ability to do the same (but in future games restrict him even further as this push made all Confederate resistance futile)

We ended up playing two games of this. One Friday night and the other Saturday.  Both followed the historical narrative.  The boys seemed to have quite a bit of fun with these smaller 'fast' games.

part of "Hooker's" Westphalians 

Westhphalians vs Bruswickers defending Lookout Mountain (my command...and my favourite Napoleonic army..love the somber black. Converted plastics)

a mid-battle overview with Thomas's troops in the centre having left their entrenchments and attacking the Ridge (right of photo), and 'Sherman's' troops slowly marching to assault the British Highlanders on Tunnel Hill (upper right).  Lookout Mountain is off-camera lower left.

You can view DavidB's blog at  David's narrative  for more on this scenario

Blenhiem - Napoleonic style

 Hosted after the two year hiatus, my big summer game of Napoleonics.  I use the opportunity to do a scenario outside the era, and have in the past conducted Gettysburg and Antietam among others. This year using the War of Spanish Succession battle of Blenheim fought in 1705.  A 'nice' linear battle with large commands enough for the five commands expected. The boys came from four different cities, indeed states, and would travel over 1200 kms to play. My thanks.

So on the Allied side was JamesC coming up from Oregon who was Eugene (using my Prussians), PeterM  from Burnaby, who had Cutts' contingent facing Blenheim using my Saxons, and in the middle using Russians, I was a (poor) Marlborough.  On the French side was SethT from Seattle as Tallard commanding, well, French; and DavidB from Vancouver Island as the Elector using my Italians and every green-clad cavalry unit.

I will add comments to the photos as expose' to the game. 

A couple of early comments.  As it was a battle from the Age of Marlborough, it contained much more horse than the usual Napoleonic affair.  It brought an interest dynamic to the tactics which everyone enjoyed.  Once could use combined arms much more effectively.  The horse elements force the infantry into square, the artillery effectively pounds the squares, the infantry now roll over the weakened and out of formation enemy infantry. Attacking becomes more problematic and takes more thought and time. I did neither and so my grand attack, the attack which won Marlborough his fame and naming of a military era, did not occur.  However, everyone else fought well.  

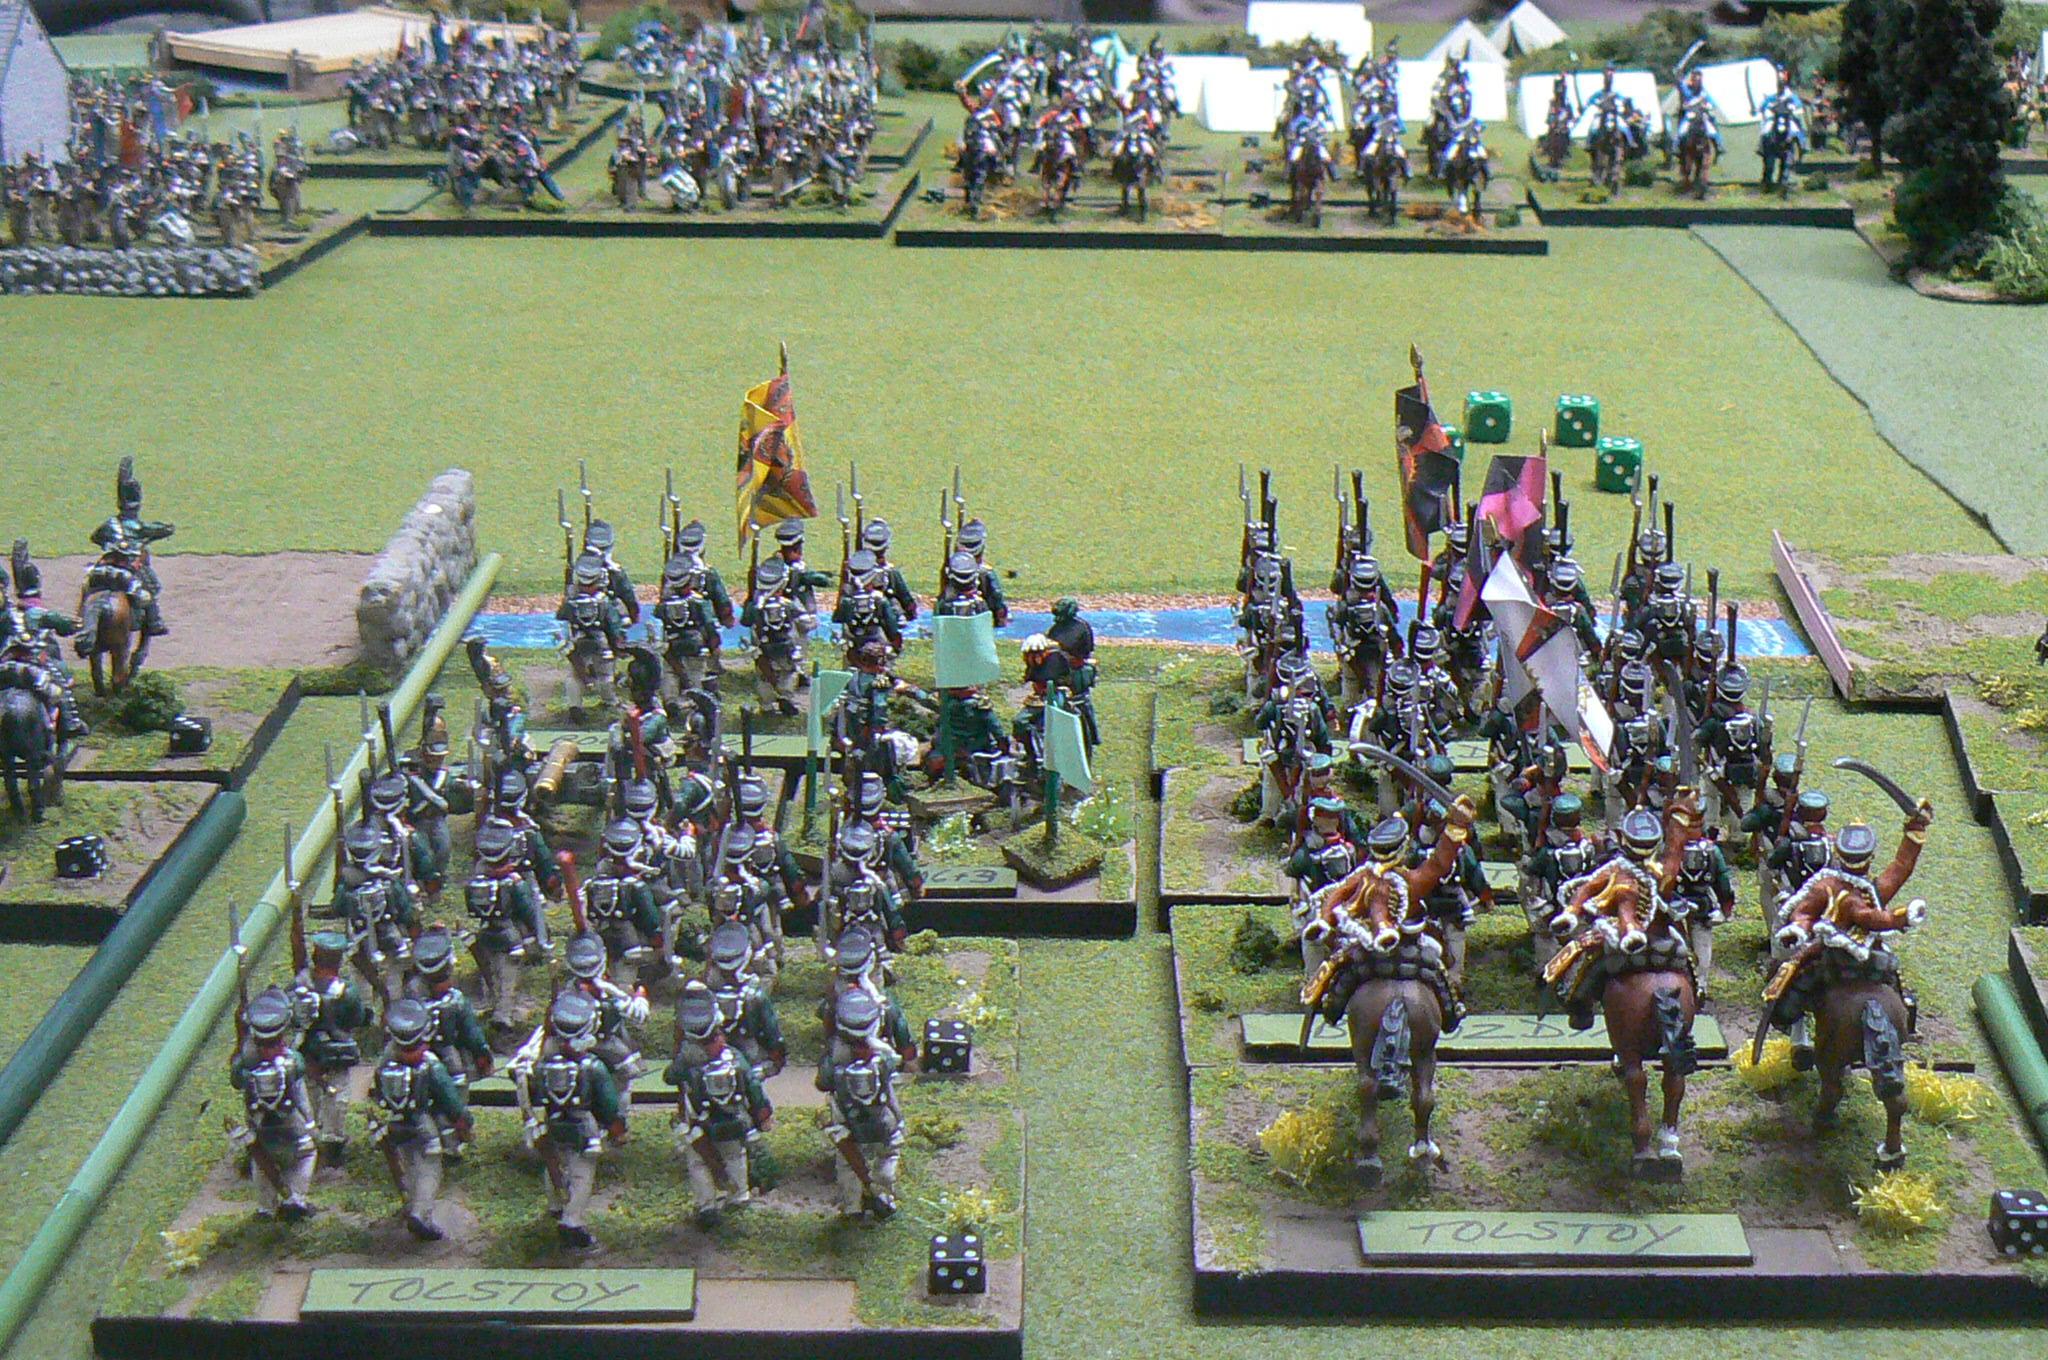
looking from the south (the usual view of the Blenhiem maps) show Oberglau upper left and Blenhiem lower right. The French on the left, Allies on the right across the Nebel River.


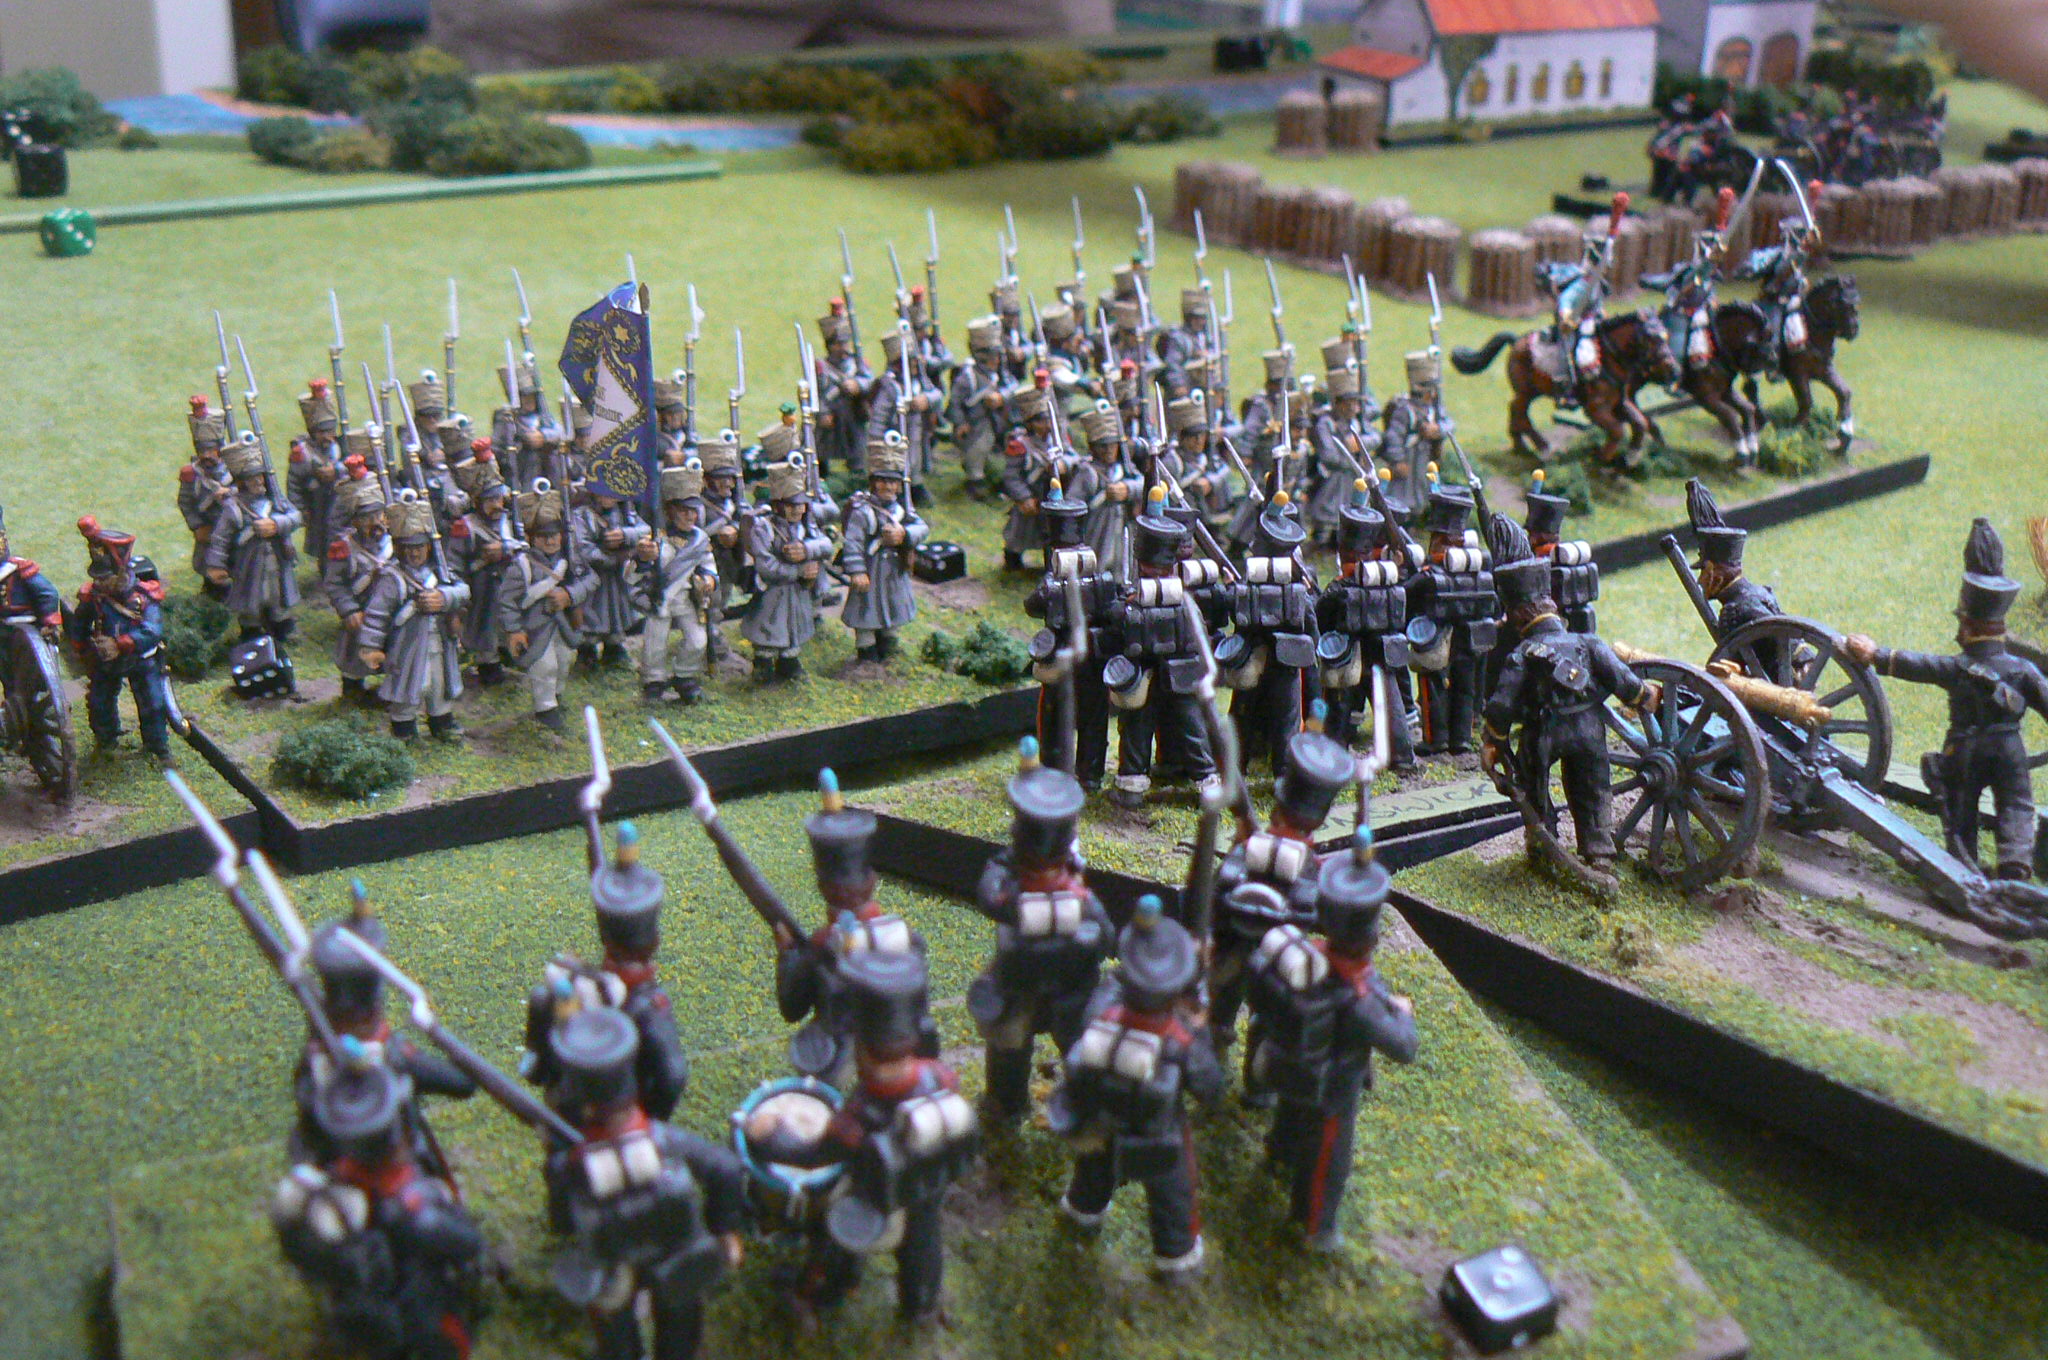
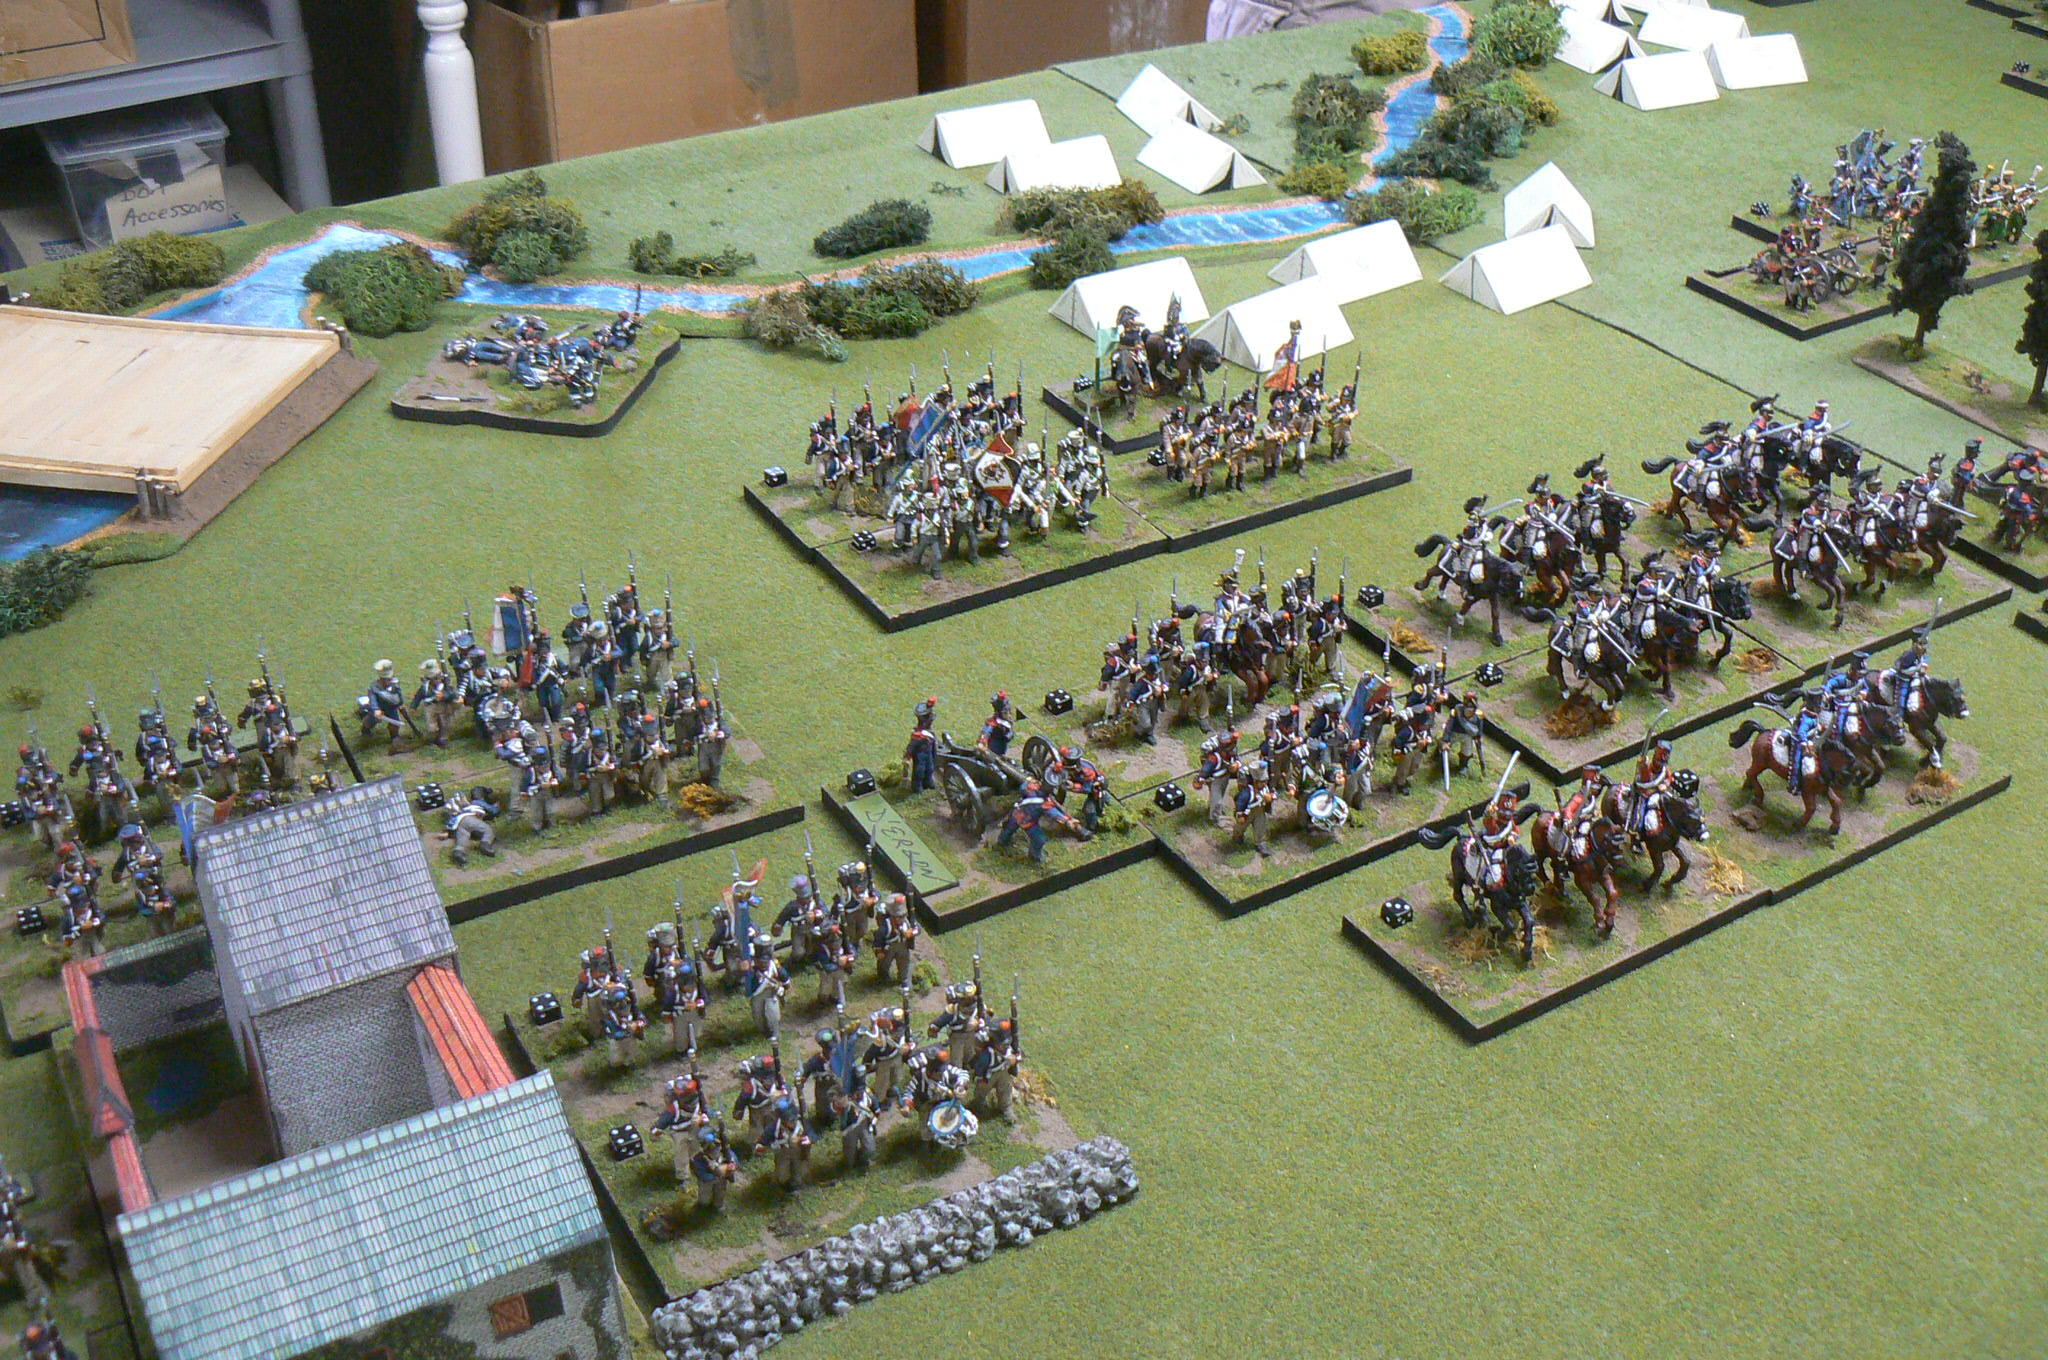
part of my contingent starting to cross the waterway

My Saxons under PeterM's careful command.  The wagon is that from my Dutch-Belgian contingent and represents his LOC if forced to retreat.  The Saxons represent Cutts' mainly British formation of the actual battle going up against the village of Blenheim.


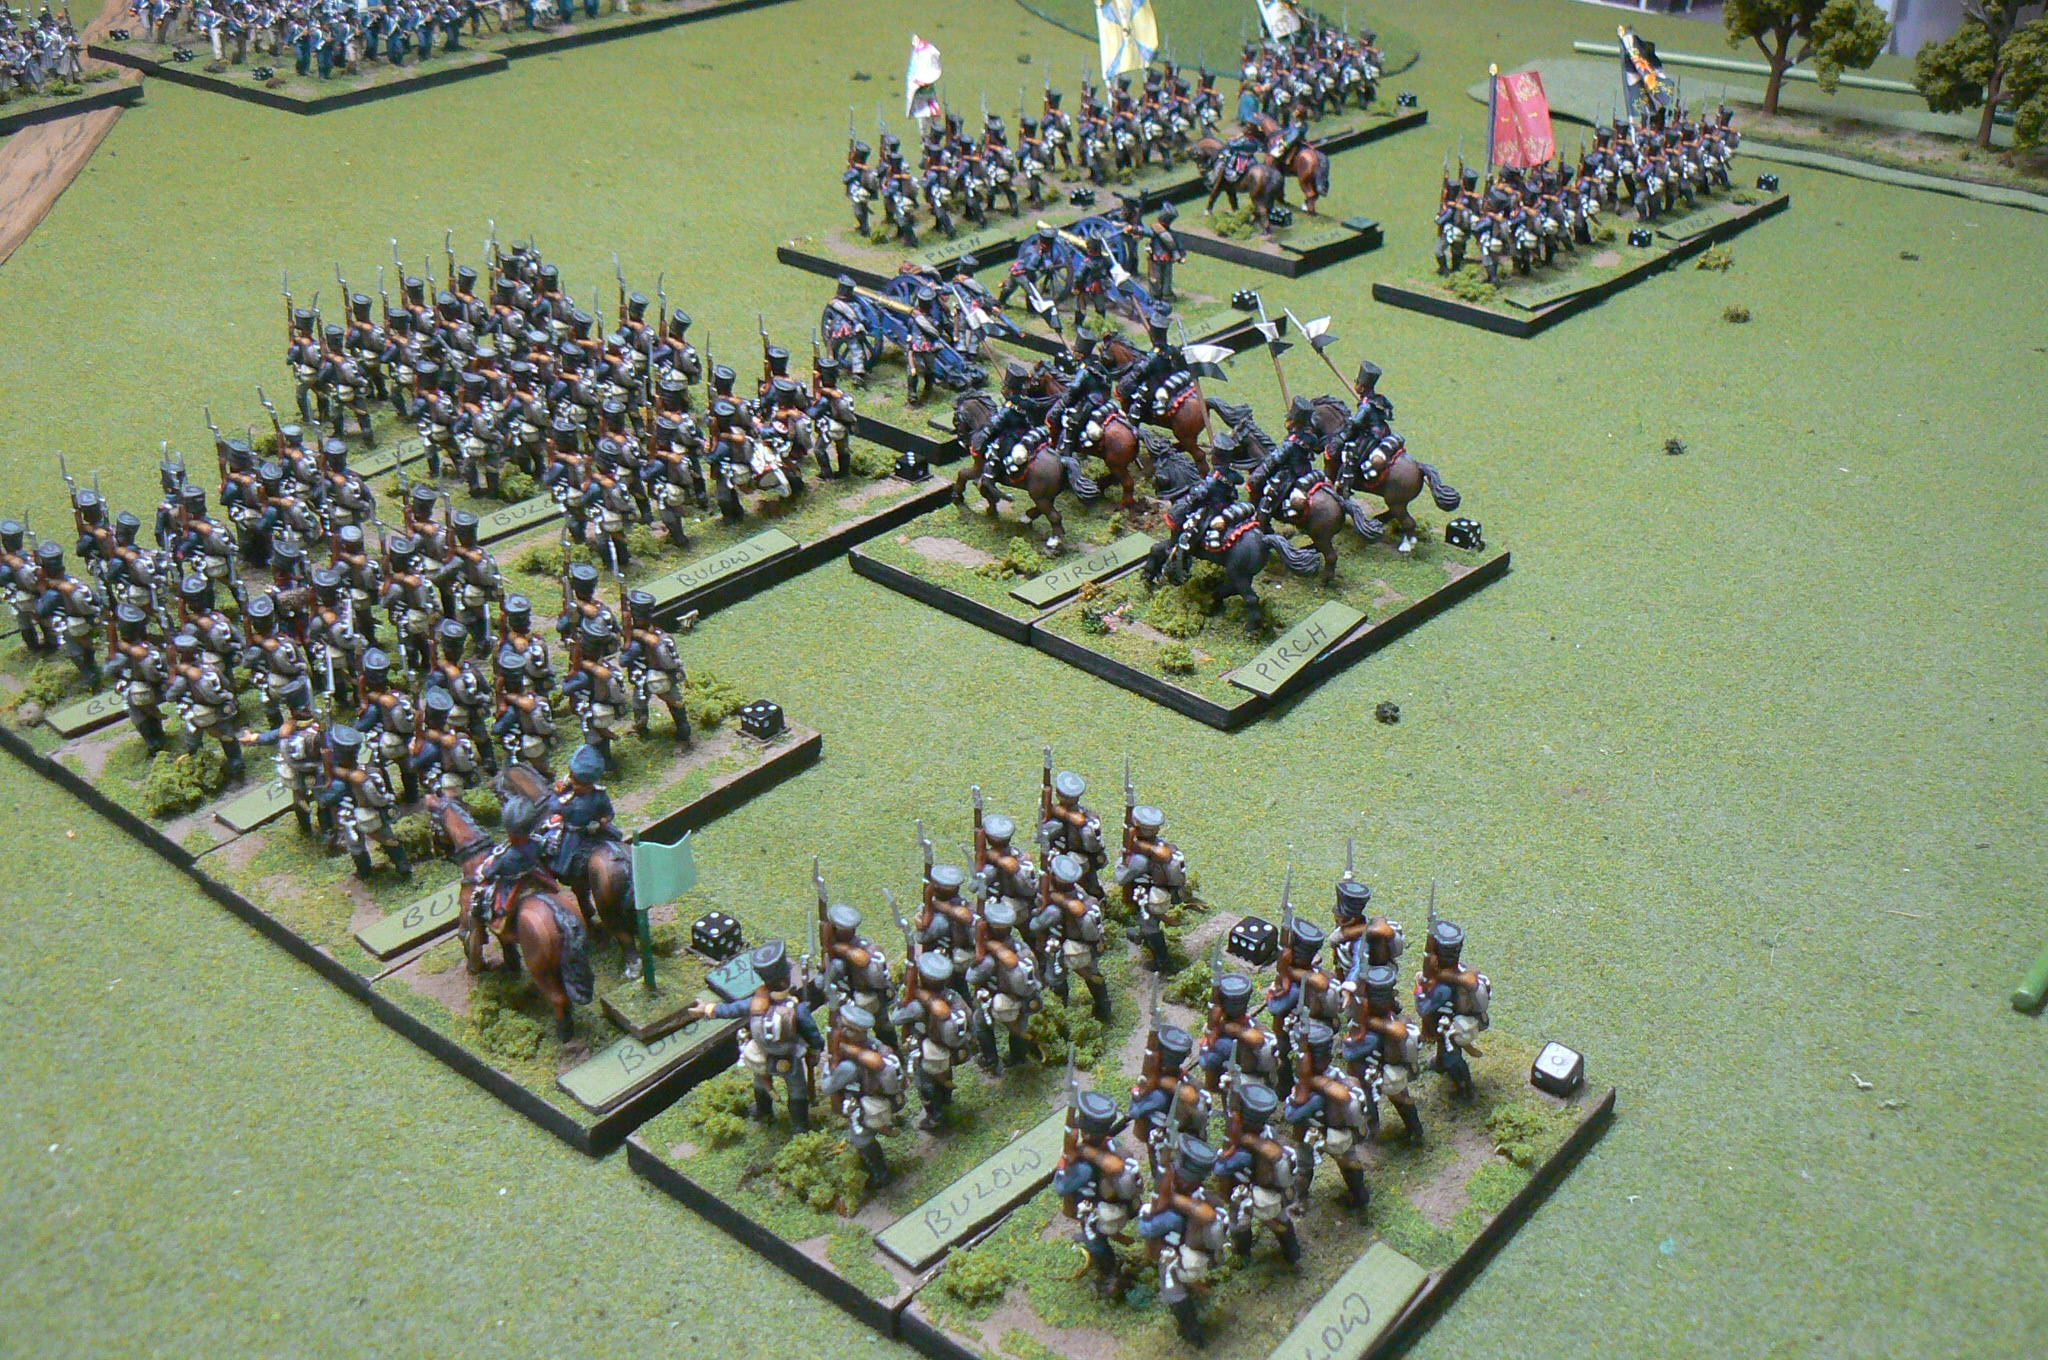
For the Napoleonic Russian fan.  The sticks are our measuring devices.

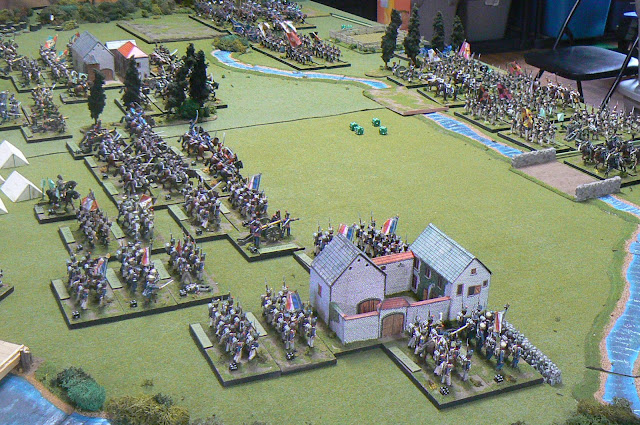
View showing the early deployments. Each infantry stand represents ~2000 infantry, ~1000 horse. We still manage to put the large battle onto a 8 by 6 foot table with room for maneuver. 

Seth's dispositions very much replicated the actual deployment by Tallard in 1705.  To have some semblance like that of the real battle, the French Victory Conditions were to maintain the villages. Thus they committed a large potion of their infantry to that task as did the French in the historical battle. 

A Marlborough, I ain't...... (The Perry representation of the Napoleonic commander Kutusov actually giving an order!) I used my Russians for my command.

I leave you with a delightful AAR written by JamesC who had to suffer through a two-hour border wait but used the time to compose this wonderful narrative:

"The initial Prussian deployment was based on the feeling that the Franco-Italians would deploy as close as possible. (ed. note: I used a blind to keep the opposition deployments secret for the first time) The four Prussian infantry bases were tasked with crossing the muddy Nebel to capture Oberglau. The cavalry, all 8(!) bases, would swing to the right to hit their flank and also have some Light Horse run deep into the enemy’s rear to capture their LOC. In-between them would sit the paltry Prussian artillery consisting of one foot and one horse artillery bases. 

That plan was undone when the screen was removed and Zeithen saw across the stream, in front of the town, was a mass of Italian Heavy Horse. The foot artillery immediately opened up on the enemy horse, causing a hit but also breaking their guns in the process, cutting the units effectiveness in half. The infantry (wisely?) decided that crossing the Nebel and being disordered within charge distance of some angry Italians on large horses would be unglücklich (Ed. unlucky) and held their place. The cavalry started their glorious advance, supported by the Horse Artillery. 

The cavalry continued their advance over the next two turns while the foot artillery  tried their best to make an impact on the pasta-loving horde. They reduced a base of HC to one pip and promptly decided they had done enough and packed it up for the day. The infantry crossed the stream and immediately found out that was, indeed, a bad idea as the lead left element was charged and pushed back across the river. The other lead element decided to block an HA from going into the Prussian center by moving in and (illegally as it turned out) going into square. The Italians sent a cheeky infantry base in and charged the Horse Artillery making them scramble to the rear. 

On the right, the cavalry continued their pursuit of glory, sending some Italian light horse running and making short work of the cheeky infantry base. 

Things settled into a bit of a stalemate as the Prussian cavalry was stymied by a screen of infantry in square. The infantry was content not to challenge the Italian HA in front of the town. The Horse Artillery moved up to start blasting the squares and soften them up for a glorious charge. A base of light cavalry was sent around Lutzingen for the Italian LOC.

By turn 10, the Heavies had had enough sitting around and two units hit one square and sent it packing. The same artillery softening followed by a cavalry charge was then done in subsequent turns to the remaining infantry base in square between the two towns. 

Some smartly dressed Neopolitans swung around Oberglau to try and hit the Prussian squares. However, they did not count on the infantry across the Nebel doing the very un-Prussian like move of a disorganized charge into their flank. Even though it was an even fight, the sight of a horde of muddy, wet Germanic manhood was enough to make the Neopolitans long for the sight of Vesuvius again and they left the field. 

Everything was going Prussia’s way. That was when a unit of Heavies pursued and destroyed some Italian Lights, but exposed themselves to artillery fire and were destroyed. The ensuing morale check on Turn 15 resulted in a Prussian withdrawal to think things over. This ended up being decisive as it meant the Prussian Light Horse was unable to reach the Italian LOC before night fell and hostilities ceased. 

While, yes, the Italians did technically hold both towns, they were surrounded by vengeful Prussian horse and a largely intact infantry. Of course, the Prussian morale victory was in a tactical defeat for the Allied Prussian-Russo-Saxon side. As the sun set, all Zeithen  could do was throw up his hands and let out an exasperated “Wir haben es versucht.”  (Ed. We tried!)"

Again I would like to thank the efforts of everyone to attend.


Monday, 3 January 2022

a Waterloo Square

I don’t usually start the new year with the traditional pledges to one-self regarding the hobby. These promises often (never?) come true and, like so often seen in military history, generals, as we wargamers, are often fighting/collecting the last war/our last impulse, only to be met with unexpected new weapons/toys to fight/paint.   Well, I have enough weapons/figures to keep me going without even thinking of what other wars/projects I might do!

So just trying to ‘clean-up’ those already in the to-do tray, including the many Napoleonic era Highlanders that friends have so kindly given me.  Decided to paint up two large formations of them, the 93rd and 42nd and mount them on 20mm rounds going them an individualistic look for a large square formation. Finally finished the second lot (the 42nd) on the first day of this year. This 97 miniature strength formation will form an interesting eye-candy ‘terrain’ piece for any large Napoleonic Waterloo all-cavalry affair our group might come up with after this Covid thing subsides.


Victrix plastic Highlanders.  To facilitate the easier painting of the kilts (ha!) I attached the arms with the interfering musket after doing the torso and the and painted them last.  


Tuesday, 23 November 2021

Poniatowsky -Polish Commander

Napoleonic fans will recognize this commander's name.  The dashing leader of the Poles for Napoleon, he struck a pose quite equal to Murat.  


DavidB, one of my wargame buddies spotted him in my last blog post.  I thought I had previously posted about him but can't find it, so I thought I'd give Poniatowsky a quick spotlight.

My version of him was created from a miscellaneous metal horse I had lying about, added plastic cavalry legs, a saddle and cloth,  modified the Poles's torso with a bit of green stuff, glued on arms.  [These gave me the most grief to be honest as I needed them to look like they were holding the reins.]  To the horse was added the lace and decorations to the horse (the horse coloration was apparently popular with him - and the much older Polish Winged Hussars if the classic 'uniformologist' Richard  Knotel's illustrations are to be believed).  Finally,  the square topped chapska, a Polish particularity, was a chore too much -- I simply cut off a poor lancers metal head...


Not my best work but who doesn't like bright pink (my version of "Polish Crimson") on a uniform! Heck, even the German SS tankers gave their black uniforms pink trim!

Franclune part2


The 'French' army in the initial attack.  Wurttembergers on the far right, the Italians, the French Middle Guard, the Poles with the purple crimson flags, and the Croatian contingents fighting the dark-green 
Russians of Wagner's division on the near left.The Harpeth River (top) funnels the French/Confederate attack.


With many small commands, the French were able to move most of their forces into the attack of the Russian lines, aligning elements,  as the assault led to an every decreasing frontage.  While some elements of Wagner’s (Wagnasky’s ??) exposed Union Russian division held for a bit longer than historically, it did retreat back to the main line creating disorder and, with its destruction, a loss of the overall army morale. The total loss of a ‘corps’ decreases each other command.  With enough army losses, each command has a more difficult dice roll to make to continue the fight.

However, the field emplacements would cause some loss for the oncoming French  [ As the rules are specifically designed for the rather open and rare use of field fortifications of Napoleonic warfare, I added that the emplacements would offer the defender the victory should both sides have a combat tie. As ties are likely, this proved to be an important factor in the fights ]


Surprisingly, the major breakthrough came as the Wurttemburgers surged over the more extensive ‘stone wall’ defences of the Union Russian left given a +2 bonus [historically it was defended by an extensive abattis]. {the breakthrough probably more due to my dice rolling than anything to be honest!}

The 'Regiment of Joseph Napoleon' the white coated Spanish of the French Army, are again trying to take the Russian field emplacements (the straw fence!), are on their last gasp (the 1 pip showing on the small black dice on their base), but roll a three on the large 'combat dice' - a fortunate result.  However the Russians, also on their last legs, also roll a 3...and as the tie goes to the defender...well, the RJN did not gain a heroic victory this day..... 

While the Russian artillery fire proved to be rather weak { it had very disappointing dice rolling!}on the Russian right, it had enough to weaken the on-coming French foreign troops so the Russian defensive line withheld easily.  The Russian far right division started to move toward the middle to close the gap, however with the immediate Russian reserve coming into play, the French morale started to fail with the losses [ rule note: while the loss percentages are similar between small and large commands, the small French commands (taken from the Confederate OOB) cannot sustain many element losses before being unable to continue attacks.  While I did roll well for all the French morale rolls calling for only holds, rather than retreats, this had the effect of halting any further advances and allowing the Russian to plug and reinforce the gaps.  


The French commander (well, me actually …) had to make the decision whether one more push would gain the Union LOC,  looking very near and which would win the battle; but conversely might destroy his army completely.  (Historically the Confederate commander J.B.Hood, took the later course and would indeed destroy the best part of his army.)

I took the more conservative course and call it a day.  So after four and a half hours of fighting or some 9 game turns (about the same time of the actual battle - from 16:00 to 20:00 hrs.) the game concluded much as the historical battle with the Russians still in control of Franclune, ah, Franklin, and the French badly mauled.   But like most wargames, heck, real battles themselves, a couple of different rolls of the dice could/would make the outcome very much different.


Friday, 19 November 2021

"Franclune"


A “Napoleonics” game but with the set up from another era altogether,  I am calling the Battle of Franclune.  


This photo of a magazine cover with Troiani’s artwork might give you a clue to the game’s scenario….


A view of the Reb French Grande Armee ready to assault the Union Russian forward position  


Some of the deployed units are my newly-painted elements which form the Confederate Bate’s division:

On the left is the 3rd Provisional Croatian Regiment employed in Russia 1812.  On the right, the 2nd Provisional Croatian Regiment in 1813 still wearing old Austrian uniforms with modified Austrian shako with added French pompom and cockade. I used the illustration within the Osprey reference MAA 410 Plate F3 as a guide with the shako created from a British shako minus the badge scraped off and painted on the frontal cockade, gluing a pompom on top. In the rear, the Joseph Napoleon Regiment formed from sympathetic Spanish and used in Russia in 1812.

These overcoat Polish units are also newly-painted using Victrix French Guard marching poses and the covered unique squared-topped Polish chapskas, spares taken from their Imperial Guard Lancer set.  In the middle is one of my rare metal units. Together they form Brown’s Confederate division.

An overhead shot of the deployment of the Reb’s army (bottom) as usually shown on the battle maps looking north.  The Union’s exposed Warner’s Division is the three elements in front of the main Union Russian line.  The stone wall represents the more fortified works of the Union left. 

 Historically the Rebs suffered greatly against the the defences and only made a brief single breakthrough which was stopped by aggressive counter attack by Opdyke’s large brigade, seen positioned in the town.   

We shall see how this plays out.