Thursday 30 December 2021

Slingers

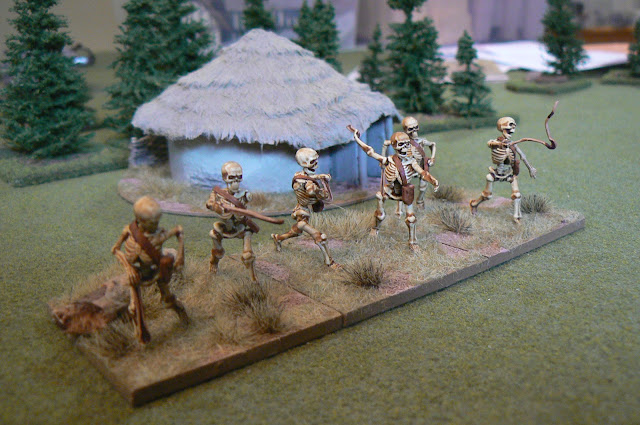
 One more calcium-deficient unit...slingers.  While the weapon distinguishes them as slingers, the lack of clothing or headwear can have them available for any ancients, or indeed a fantasy army, but they will constitute a skirmish unit for my Ancient British force.


I added a styrene belt and attached bags adapted from plastic WW2 model pouches.  Wire produces the corded slings.

For decorating the table,  a Celtic house, as seen in the background, built from a packing tape roll,  cone-shaped cereal card, some foam-core, and teddy-bear fur for the thatch.  

Now to go out a dig out the walkway of snow.


Monday 27 December 2021

Bones

Nothing says the Holidays as much as bones. Going ‘caveman’ and gnawing on the thigh bones of the turkey is a particular favourite treat for me, so not surprising, during these Holidays, I am painting up bones, many bones.  Skeletons to put a fine point on it. 

My Romans “were getting lonely” so I decided to make an opposition for them. The spur was a box of plastic Celtic Chariots (formerly made by Wargames Factory).  I had sold the other part of that force to a wargamer friend who decided that the chariots were not compatible to the Victrix versions he had just picked up, so I was left with them. They sat for a while, but during the late summer, I had tried to make some plastic horses from melted sprues (*see note below) but as you can see from the photos they did not quite come out as I would have wanted…. However, they still had the shape of a horse and the rather ‘rough’ surface did look like decaying flesh. Skeletons in the making, as it were.  The original ponies are now set aside and these de-fleshing horses will transport the chariots driven by Ancient British skeletons. 

The reins are from the Victrix versions which were given as the wargaming buddy decided to do his in thread.  They were the perfect length, fit into the yoke fittings perfectly and had the hands attached so could be given the boney arms with ease.

I consider the whole collection less fantasy and very much a historical armed force…. well, OK, minus the flesh.   


Firstly I have bulked up the Roman force by adding an Auxilia unit.  I managed to find some faceless Roman helmets. Recent research suggests that Auxilia and Legionnaires were more closely equipped than once thought and it is offered that only the oval shield would be the major distinguishing feature.  But I did not have any oval shields laying about.  As I was pondering this, I noticed that I had not thrown away the bases cut away from the previous batch of skeletons used for the Romans placed on the flat ‘palace tiles’.  As seen from the following photo these former bases are of a perfect shape and size.  The newly repurposed pieces were quickly sanded down a bit flatter and received a new GS boss using a paint dropper bottle top as a mold.  It was surprisingly easy to do.  As these shields were, presumably lifted from the ground by their users and so would not be factory new, I did not worry overly about perfect copies.  

note the similarity of the shields to the bases of the figures!

The mold for the shield bosses

The other Roman unit created are archers.  These are helmet-less but do have a small shield which came in the box, along with the quivers (duly scraped smooth of any ‘fantasy decorations’!) and used strips of styrene for the belts to hang all the equipment upon.

note the two markers in the foreground for those units who have 'legged it' (these lower legs were not needed but I try to repurposed most plastic bits) 


Photos of the rest of the Roman force.


(*  The sprues - the frames on which the plastic parts hang and of the same material as the models themselves - are not recyclable. Rather that throw away, I thought to melt down with acetone and try doing a few different things with this mash.  The horse molds did not really work but the bubbles and miscasting certainly have a zombie jive to them!)


Tuesday 14 December 2021

“Nateville Campaign” the first engagement


My new wargaming pen-pal offered to create scenarios for me to play out for which I am using one of my War of 1812 collections. This is the solo-play of the first of the engagements. The set up can be seen at:link to my previous post of this campaign

While Canada was, at the time of 1812, very much British territory and all those (well most anyway) would say they were British citizens, this particular miniatures collection has only military units made up of people who were of North America and has no British Regulars.  It is based on an all-Canadian, both French and English speaking inhabitants, who fought the Americans along the Chateauguay River in 1813. Thus, I will call them "Canadian" throughout the narrative. 

 The Canadian raid on the Town of Nateville had party of Abenaki Natives, the Canadian Fencibles (Regulars) and supporting Sedentary Militia downriver of the main force of Select Embodied Militia (SEM) (well-trained militia), and Voltigeurs (well-trained, experienced light infantry) to cross the main bridge to take out the American ammunition caisson to hamper the forming American invasion of Canada.

The engagement thus formed two distinct areas of operations which we shall call "the left flank" and "the centre" at the bridge or town.

The day started on the left with the Abenaki crossing the river together with the Fencibles.  The American Combined Light Infantry (a unit of those companies of the various regiments who were considered to be light infantry trained.  Some debate as to their training or even if they had distinct uniform differences) quickly formed up into close order to meet the oncoming Fencibles who would forego any shooting and use the bayonet charge.  A bloody melee ensued causing casualties and disorder on both sides. 

The Fencible charging the defending American Lights (in blue uniforms), the British officer on this flank directing the attack.  During the entire battle the American commander did not emerge from his headquarters in the town. (I would have him on a separate activation as the raid was to catch the Americans by surprise)

Meanwhile at the bridge the Voltigeurs were in mid-stream fording the river when they heard much screaming and stopped frozen in place - well, they failed to advance for whatever reason! - as the American Volunteers ran passed in front of them in rout away from the charge of the 3rd SEM.  The American Pioneers simply put down their tools and surrendered.

The rout of the American Volunteers from the 3rd SEM (left) and watched by the grey-clad Voltigeurs (bottom) in the river.  The artillery can be seen on the hill.

The rout of the Volunteers did clear the field of fire for the American gun on the hill, but in the haste to load the cannon they inadvertently reversed the cartridge...or because I rolled a poor 4 on their activation dice?...

In Nateville, the bulk of the US infantry seemed obvious to all this fighting as they did nothing. At this time I had now rolled under 4 pips - on two d6 - for four successive activation rolls!  Do note that for Rebels and Patriots rules activation for a unharmed unit is only 6+ on two dice.  Perhaps the dice did have a bias this day as the Canadians favoured well than the American rolls.

The brave 3rd SEM kept up to task and quickly proceeded up the road to Nateville and a double-sixes activation roll brings into action the reserve of the 1st SEM unit. 

The 30th US Infantry moving up (slowly....) to support the Combined Lights 

Back on the left, both the US Lights and the Canadian Fencibles reform after their combat but the Natives continued musket fire causes further disorder to the Americans.  The fight would continue until the action in the town was resolved to signal the Fencibles to give up their fight with the American Light company who gave a surprisingly good account of themselves.  Both units sustained 30%+ casualties.

But it was on the road to Nateville that the battle hinged. The 3rd SEM, not seeing anything of the Voltigeurs (yes, yet another failed activation from this unit.  It was to have two more in turn and thus play no part in the engagement) saw the gun on the hill as a distinct threat and poured a devastating fire upon it causing half the crew to go down and breaking the morale of the artillerists.

The marker to the left indicates 50% casualties on the artillery unit.  A grave morale situation indeed in the Rebel and Patriots rules.  

The officer with the 3rd SEM at the ammo wagon. 

The sounds of gunfire finally drifted to the town and eventually all three Infantry Regiments started to move in its defence.  

The final moments of action as the wagon is alight and the Canadians (in red) about to depart. The American units could only fire off a single weak volley of fire. 

With the new reinforcing 1st SEM moving up to the bridge to secure the route of retreat and ignoring the plight of the artillery, the heroic 3rd SEM continued up the road to find the prized ammunition wagon just ahead of them with the teamsters desperately trying to move out of harms way.  The SEM officer also could see the masses of the 10th and 31st US regiments emerging from the camps towards him.  He decided to risk a further run up the road might get his unit up to the wagon to disable it or alight it and hope the following 1st SEM would help his inevitable hasty departure. And indeed fortune favoured the brave as a fortunate Attack Activation roll of 10(") and a quick thinking musketeer jamming his weapon into the spokes of the rear wheel had the wagon come to a stop. A lit cloth was deposited under the lid of the wagon and the unit made a hasty departure under rather poorly aimed gunfire by the oncoming American regulars to the sound of a mighty explosion.  The American ammuntion supply was destroyed and the Canadians made their escape.

Casualty count:

Americans: Combined Lights  4 figures out of 12, Artillery 3 of 6, Volunteers 1 killed, 4 missing (rolled for), Regulars - all three units 0 of 18 each.

Canadians: 3rd SEM 2 of 12, Fencibles 5 of 12, Abenaki 0 of 6, Montreal Sedentary Militia, Voltigeurs, 1st SEM all 0 of 12.  


"dog-sniffing", WaT, Early WW2 winter tank action

As mentioned in the previous post, my Early War 1941 winter Eastern Front “What a Tanker” game that evening had four players (including myself) with a very simple “us v them” shootout.

My t-26 in the foreground running from the German looking to shoot 'up my butt'

A PZIII and PZII against a T-34 and T-26. The night’s dice were fickle indeed as the one necessary die to complete the desired activity - usually shooting of course - failed to occur.  Everyone was affected. But for me, the rather exasperating failure to do anything useful from a full set of dice only happened once, so that was good.  And I got a kill, taking out the PZII with one shot. Rare indeed.  It was early in the night, so I had the defeated player bring on a PZ35 (a rather better tank and game equivalent to a PZIII.  I spend the rest of the game trying to avoid it!  All the while looking to see if the other German had a shot at me!

"dog-sniffing" In the background the German is chasing my t-26, while in the foreground, the partially-whitewashed t-34 is ready to shoot at the rear of the heavily camouflaged PzIII.  ED NOTE: This was only part-way through the battle; this would continue for quite some time.  Weird game indeed.

The game tended to resemble a “tail sniffing at a dog park” as one wit suggested, during which we circled around the snow-covered burnt-out buildings looking to shoot each other up the tail pipe (the weakest armour point) However throughout the night each of us would fail dramatically to get the relatively easily achievable 3+ on the dice, and roll lots of 1s and 2s instead. Ce la guerre!


Big v Small


If you are hosting a game is it very good to know ALL the rules so I wanted a practice game before hosting a “What a tanker” game that night.  But I already packed up my usual winter terrain, so I put out a very plain table of a Russian village, a couple copses of trees and my latest t34/85.  But what about an opposition?  Well I do have a 1:56 R-35…. A bit mis-matched admittedly.  Understatement no doubt as the Russian is a 8 Armour, 8 Strike beast vs the early-war two-crew 4 Armour and only 3 Strike. 

obviously the R-35 to the left and the Russian t-34/85 behind

Thus, I would have the R-35 (run by a Romanian crew being Eastern Front and all) only wanting to go back home, to cross the table and exit.  The Russians were sleeping in a village house.

Perhaps rather foolishly the Romanian commander decided to take an open pot-shot at the “sleeping” Russian hoping for a lucky shot. He failed to hit.  The Russians were slow to wake up and get active.  The Romanian’ further move past an intervening house allowed him a second shot. This too failed, but the Russians were fully awake and on the move.  They rounded the church but the dice failed them and the shot on the rear of the Romanians could not be taken.  

Yikes! the Romanian is shitting bricks!

The Romanian command dice then blessed them with a long move to - almost - off the table - and freedom.  But not quite, so allowing the Russians to get one more shot off with their big gun. They took the shot but it failed to hit the rear of the small French-built tank! (8 dice needing 3+ but getting only two hits —-I am such a terrible dice roller when needed! )  the Romanians managed to get enough saving rolls to sigh a big relief as they exited the battlefield and continue their way home…. 

The R-35's turret is facing the Russian while the vehicle is making off the table..


Saturday 4 December 2021

The 'Nateville' War of 1812 campaign #1


A new wargaming pen-pal suggested the following to be a idea of a scenario:

“For you, Doug H,  I'm thinking some War of 1812 action to blog about.  A solo campaign that i can feed a bit.

The Americans are preparing an offensive and are gathering supplies and mustering troops in a town.  The Brits have caught wind and have decided to launch a spoiling attack before their own reinforcements arrive.

Scenario #1.  River crossing raid.  A smaller British force with Iroquois allies launches the spoiling attack versus the inferior quality but superior numbers American force.  A bridge (defended) and/or boats can be used to cross the river.  The river is only partially defended, then the heights to cross (also partially defended) before the town can be reached.  The majority of the American troops are in/near the town.  The British objective is to destroy the ammo dump and retreat without catastrophic casualties.  Terrain is wooded with a few farms and the major road to and from the town, bridge, and table edges.

-American activation.  Units are unaware of the raid and can not activate unless they make a successful roll.  Roll modifiers include LOS to British units, or being x distance from a firing unit”.  

------

I therefore came up with the following table set-up for my upcoming “Nateville Campaign”:

the War of 1812 theatre of operations around the fictional border town of Nateville, Vermont in the year 1813.

The American volunteers guard the bridge while the Regular Pioneers (stand on the left) do repairs on the bridge strengthening the timbers to allow the artillery to cross supporting the upcoming invasion of Canada. The artillery is in guard position on the hill in the background before the town.  Little that they know the Canadians have other ideas than to accept the invasion with little activity of their own....

The object of the Canadian raid: the important American ammunition supply. A unit of American regulars form up in front of their tents. Of note: the horse teams are Perry British but I replaced with Old Glory early war American heads.  The wagon is a Warbases MDF version of a Napoleonic baggage wagon painted in the light blue color of the American equipment during this time.  These Warbases wagons are quite good and easy to put together.

More American regulars camped on the far side of "Nateville, Vermont".  Of interest are my wooden tents. Yes, indeed they are made from wood found abandoned at a construction site in a nice triangular shape ready to be cut into tent sized portions and carefully sanded edges to give that 'canvas-draped-over-a-pole' look. The rest is just paint.

Further to the east of the bridge, the Abenaki natives (left), the Canadian Fencibles (Regulars near the creek), and French-Canadian militia (at right in the red caps) are ready to surprise the American 'Combined Lights'' Battalion (near the cabin).  The bridge is at the upper right ready to be assaulted, and  Nateville is in the distance. Most of the buildings are scratch-built by me.

I think I will use the Osprey Publishing rules "Rebels and Patriots" for the games.  Hopefully soon, but currently I find I am drifting from one 'project' to another in rapid fashion worse than a Ritalin-deprived butterfly.  

Monday 29 November 2021

Tower building

and multi-tasking…

Hey, I like watching American football like the next guy, but as someone with a stopwatch has suggested, there is only some 9 minutes of actual playing in the average American Football game.  The rest is the huddle, timeouts, or the color guy relaying statistics or making insightful observations like "You have to run the ball up the field to make the yards" . There are always the replays to cover the intervening time.   It is therefore easy to accomplish other tasks while “watching the game”.   Gluing hundreds of individual card tiles on a model’s roof is a useful way to spend that quality time.  

I just noticed the different colour of card in the roof tiles so a tracking of my progress can be seen.
 

The tower’s column core is a very thick card roll (ex-plastic wrap holder) on which pieces of cereal box card is glued.  The wood upper deck is a packing tape roll covered in wooden coffee stir sticks. The roof is removable with flooring to place figures if necessary. The lower windows are metal versions stuck on and yes, the main door is well high up the tower but I have constructed removable stairs so the inhabitants can make it a bit more defensible.    Now to paint the thing!


Saturday 27 November 2021

...somewhere in the Sinai, 1917


Battle of El Itwil’do

somewhere in the Sinai, 1917

You are Captain Angus Young of the Queensland Fusiliers and you are deep in it.

Your commanding officer a pommie bastard named Sir David Evans wants more glory; at your expense. So he has ordered your unit to make an attack to take the well in the village of El Something-or-another thereby securing a forward supply of water for the upcoming campaign against Gaza and securing him the laurels of the damned uppy-de-ups.

He has you standing at attention in his tent.

“Captain Young”, he says in his high-pitched voice, “to continue our glorious advance against the Muslim hordes we are required to take the well and supply water for the troops, what.  I have come up with a brilliant plan, I might add.”

Oh crickey, you think, now we are really in trouble!

Sir David continues, “We will do something the Turks and their German masters will not expect…a night attack.  BY your expression, Young, I see it has surprised you also”

Surprised? You idiot!, your inner voice screams, night attacks are more trouble than…

Your train of thought is interrupted by his statement, “the attack shall not commence with the usual artillery as that will merely wake them up, what?”

No artillery?!”, you blurt out.

“No, Young, but we have a further surprise for the Turks”.

“Water pistols, sir?” you surmise.

“Water pistols? My good man, won’t do at all.  They would not be effective without the water obtained at the wells. Not very militarily astute you Aussies, I see.”, he replies.

You merely wait.

“My ace card,” Sir David elaborates, “is the use of two tanks my cousin ‘obtained’ on route here.  God knows where he got them from, but our gain, what?”

You finally zone out of his further comments.  two tanks blindly going around in the dark. All the while your boys must attack, without artillery support, going against no doubt heavily guarded positions we have had no time to reconnoiter and under the command of this moron..

“Right. Attack starts at 04:00.  Sir David says decisively hammering his pen upon his table. Dismissed”

It is 06:00, the sun is well up but orders were given at 04:00 to wait for the tanks. You have had the troops resting in the meantime.  You restarting to think that perhaps Evans does have some notion that the moment has well passed omitting to tell you to stand down, while he formulated another of his clever plans.

You then hear the clank and rumble of heavy engines.  The tanks are here.

As you stare at the iron monsters, an adjutant rides up primly to your station.

“Right, Young, your supports are here, you may begin your attack,” stated the waxed moustached officer.

You are dumfounded, but your inner voice calmly acknowledges that you were dreaming to think that daylight should interfere with Sir David bleeping Evans’ wishes.

“Well,” the mounted officer demands, “get on with it”

The Aussie assault with the tanks in support (the upper one already suffering 1 strength loss.


.......

Meanwhile in the village of El Itwil'do in the Sinai, 1917

You are Col. Ahmet Bazak, commander of the 32nd Osman Infantry Battalion defending the well at El Itwil’do.  You have four companies of riflemen, a battery of artillery and full contingent of machine guns.  Col. Schmilman, your German advisor fears it will not be enough. 

But it is in the hands of Allah and so you must do with what you have. 
The Turks in their trenches with artillery in support.


GM notes:
Col. Bazak, you can have your troops dig trenches throughout the previous night but this will cause fatigue so will reduce their courage by two  (from 5+ to 7+) but offers Armour 3 than 2.  [Players of Dragon Rampant will recognize my use of that rule set as the basis for this WW1 campaign].

You have yourself as encouragement for the troops (one stand of command to attach at any start of your turn to any unit to offer a one-time re-roll of any courage test.) If successful, you can move the stand to another unit.  If failure, the stand is removed.

Col. Schilman offers a one-time re-roll of any activation dice for the artillery.

The Australian LMG company leapfrogs the infantry to continue the advance.


With Peter playing the part of Young and commander of the Aussies, he selected four companies of infantry, and the LMG company to accompany the tanks in the assault.

Craig did indeed have his Turkish infantry dig trenches for themselves in front of the village and its water well. While the players did not know it, the troop points were even at 30 each, with the tanks adding 20 points to the Aussie total in the attack. 
[Note:  Tanks were indeed sent to the Sinai and used in the Battles for Gaza, but had limited success and many were destroyed by Turkish artillery; the rest withdrawn back to the Western Front shortly thereafter]

While the Aussie assault ultimately failed, Peter was pleased with the ‘even-ness’ of the scenario and with different dice, the outcome might have been different.

Much discussion of the upcoming campaign was made. So further battles will occur as the Aussies thrust toward Gaza.

Tuesday 23 November 2021

Poniatowsky -Polish Commander

Napoleonic fans will recognize this commander's name.  The dashing leader of the Poles for Napoleon, he struck a pose quite equal to Murat.  


DavidB, one of my wargame buddies spotted him in my last blog post.  I thought I had previously posted about him but can't find it, so I thought I'd give Poniatowsky a quick spotlight.

My version of him was created from a miscellaneous metal horse I had lying about, added plastic cavalry legs, a saddle and cloth,  modified the Poles's torso with a bit of green stuff, glued on arms.  [These gave me the most grief to be honest as I needed them to look like they were holding the reins.]  To the horse was added the lace and decorations to the horse (the horse coloration was apparently popular with him - and the much older Polish Winged Hussars if the classic 'uniformologist' Richard  Knotel's illustrations are to be believed).  Finally,  the square topped chapska, a Polish particularity, was a chore too much -- I simply cut off a poor lancers metal head...


Not my best work but who doesn't like bright pink (my version of "Polish Crimson") on a uniform! Heck, even the German SS tankers gave their black uniforms pink trim!

Franclune part2


The 'French' army in the initial attack.  Wurttembergers on the far right, the Italians, the French Middle Guard, the Poles with the purple crimson flags, and the Croatian contingents fighting the dark-green 
Russians of Wagner's division on the near left.The Harpeth River (top) funnels the French/Confederate attack.


With many small commands, the French were able to move most of their forces into the attack of the Russian lines, aligning elements,  as the assault led to an every decreasing frontage.  While some elements of Wagner’s (Wagnasky’s ??) exposed Union Russian division held for a bit longer than historically, it did retreat back to the main line creating disorder and, with its destruction, a loss of the overall army morale. The total loss of a ‘corps’ decreases each other command.  With enough army losses, each command has a more difficult dice roll to make to continue the fight.

However, the field emplacements would cause some loss for the oncoming French  [ As the rules are specifically designed for the rather open and rare use of field fortifications of Napoleonic warfare, I added that the emplacements would offer the defender the victory should both sides have a combat tie. As ties are likely, this proved to be an important factor in the fights ]


Surprisingly, the major breakthrough came as the Wurttemburgers surged over the more extensive ‘stone wall’ defences of the Union Russian left given a +2 bonus [historically it was defended by an extensive abattis]. {the breakthrough probably more due to my dice rolling than anything to be honest!}

The 'Regiment of Joseph Napoleon' the white coated Spanish of the French Army, are again trying to take the Russian field emplacements (the straw fence!), are on their last gasp (the 1 pip showing on the small black dice on their base), but roll a three on the large 'combat dice' - a fortunate result.  However the Russians, also on their last legs, also roll a 3...and as the tie goes to the defender...well, the RJN did not gain a heroic victory this day..... 

While the Russian artillery fire proved to be rather weak { it had very disappointing dice rolling!}on the Russian right, it had enough to weaken the on-coming French foreign troops so the Russian defensive line withheld easily.  The Russian far right division started to move toward the middle to close the gap, however with the immediate Russian reserve coming into play, the French morale started to fail with the losses [ rule note: while the loss percentages are similar between small and large commands, the small French commands (taken from the Confederate OOB) cannot sustain many element losses before being unable to continue attacks.  While I did roll well for all the French morale rolls calling for only holds, rather than retreats, this had the effect of halting any further advances and allowing the Russian to plug and reinforce the gaps.  


The French commander (well, me actually …) had to make the decision whether one more push would gain the Union LOC,  looking very near and which would win the battle; but conversely might destroy his army completely.  (Historically the Confederate commander J.B.Hood, took the later course and would indeed destroy the best part of his army.)

I took the more conservative course and call it a day.  So after four and a half hours of fighting or some 9 game turns (about the same time of the actual battle - from 16:00 to 20:00 hrs.) the game concluded much as the historical battle with the Russians still in control of Franclune, ah, Franklin, and the French badly mauled.   But like most wargames, heck, real battles themselves, a couple of different rolls of the dice could/would make the outcome very much different.


Friday 19 November 2021

"Franclune"


A “Napoleonics” game but with the set up from another era altogether,  I am calling the Battle of Franclune.  


This photo of a magazine cover with Troiani’s artwork might give you a clue to the game’s scenario….


A view of the Reb French Grande Armee ready to assault the Union Russian forward position  


Some of the deployed units are my newly-painted elements which form the Confederate Bate’s division:

On the left is the 3rd Provisional Croatian Regiment employed in Russia 1812.  On the right, the 2nd Provisional Croatian Regiment in 1813 still wearing old Austrian uniforms with modified Austrian shako with added French pompom and cockade. I used the illustration within the Osprey reference MAA 410 Plate F3 as a guide with the shako created from a British shako minus the badge scraped off and painted on the frontal cockade, gluing a pompom on top. In the rear, the Joseph Napoleon Regiment formed from sympathetic Spanish and used in Russia in 1812.

These overcoat Polish units are also newly-painted using Victrix French Guard marching poses and the covered unique squared-topped Polish chapskas, spares taken from their Imperial Guard Lancer set.  In the middle is one of my rare metal units. Together they form Brown’s Confederate division.

An overhead shot of the deployment of the Reb’s army (bottom) as usually shown on the battle maps looking north.  The Union’s exposed Warner’s Division is the three elements in front of the main Union Russian line.  The stone wall represents the more fortified works of the Union left. 

 Historically the Rebs suffered greatly against the the defences and only made a brief single breakthrough which was stopped by aggressive counter attack by Opdyke’s large brigade, seen positioned in the town.   

We shall see how this plays out.


Sunday 14 November 2021

Simple Sinai - 1917


Well it has been awhile.  Down a bit from the blogging thing but not out.

 The local club opened up (with a lot of restrictions of course, proof of vaccination, wearing of masks, yada yada (mostly due to being in a civic installation perhaps) so a wargaming buddy WillB hosted a "Dragon Rampant" rules Lord of the Rings affair.  I helped his young son to a glorious victory of the Good over his father’s Baddies. Arthur appeared to really enjoy himself.


I got the idea from those rules that perhaps I could apply them to my rather dormant WW1 in the Middle East 1:72 scale plastics collection. So during the week I worked on wedging the stats for fantasy units into those for use with machine guns, tanks and airplanes…. On the next Friday, a couple of my wargame buddies, Peter and Craig,  came over to give it a go and give it a good analysis (both seem to love the mathematical/analytics of it all!)  


My collection of Australians and Ottoman Turks (mainly HaT) has been a haphazard affair as I gained the original figures in some distant deal or prize of which I don’t really remember.   They are certainly not a main focus, not really of super-interest to me; and frankly,  the figures themselves not worthy of much effort.  I must admit it shows in the rather lack of  plain terrain. Heck, even the lack of basing. Is not the Sinai desert bare and flat?!  Perhaps we should just put it down to a minimalist “old-school” approach, shall we….  

Minimalist you say?  How about tents from a used Toblerone chocolate box!  (note the red Turk chits are to indicate battered or activated (plain flip side)

The campaign I have sort of chosen to go with is the battles around Gaza in 1917. The Turks were mostly entrenched and the Allies (I have given the “Australians” a much greater role than historical as it must be said the Australian infantry only participated in the Gallipoli Campaign, moving to the Western Front so my use of them in the Sinai is incorrect. But the correct British uniformed version (from the same HaT company) are very large in comparison so will not use.

aircraft over Turkish line


The simple scenario was for the Aussies to take the village, the entrenched Turks to defend.  The game was expressly was a test of the rules. The boys were so approving, as it turned out, that much of the ‘after battle report’ was how to blend it into a campaign.    

Can’t have WW1 without tanks and strafing aircraft so I painted up those during the week for the game. Yes, British tanks (still in army green and apparently still sporting English mud in the shipment!) were historically employed during this campaign - but rather unsuccessfully. I imposed the rule that a failed move activation by a tank activates an immediate 2nd roll, failure of which has the tank immobile for the rest of the game (call it break-down, stuck in the sand, mechanical malfunction

So surprisingly a tank can be classified as a large beast. Not really a stretch, but mixed with the other classifications and a bit of specific rules, even aircraft can be accounted for in the simple ‘Lion Rampant/Dragon Rampant’ style action.  With a quick look at the stat cards I had ready, the boys knew the dice rolls needed and the action required for each of the troop types. Simple dice rolling game. Maybe not ideally historical but then, is ANY miniature ruleset??  

Turkish units behind quickly made ‘trenches’ made of self hardening clay


The tank has breeched the abandoned trenches attacking the Turkish infantry —already with 7 of 12 strength points removed. 

For the record…. and we fought it without any morale or army breakpoints…. most units were eliminated from the battle, but the Aussies had one tank in the town and the Turks could not really hurt it with their lone HMG unit. Yup we made it long and bloody but it was for a rules test, not the scenario was the end result. Some more work to do but the boys did well and gave it a good go. I thank them for it.